Visual of source BotTabSimple.

Most robots from public examples in OsEngine have only one type of source - BotTabSimple. This source allows you to connect to one instrument, receive candles, trades, order book data, and also place orders on it.
1. Creating a robot with the BotTabSimple source.
In the robot creation window, you can see the list of sources in this column:
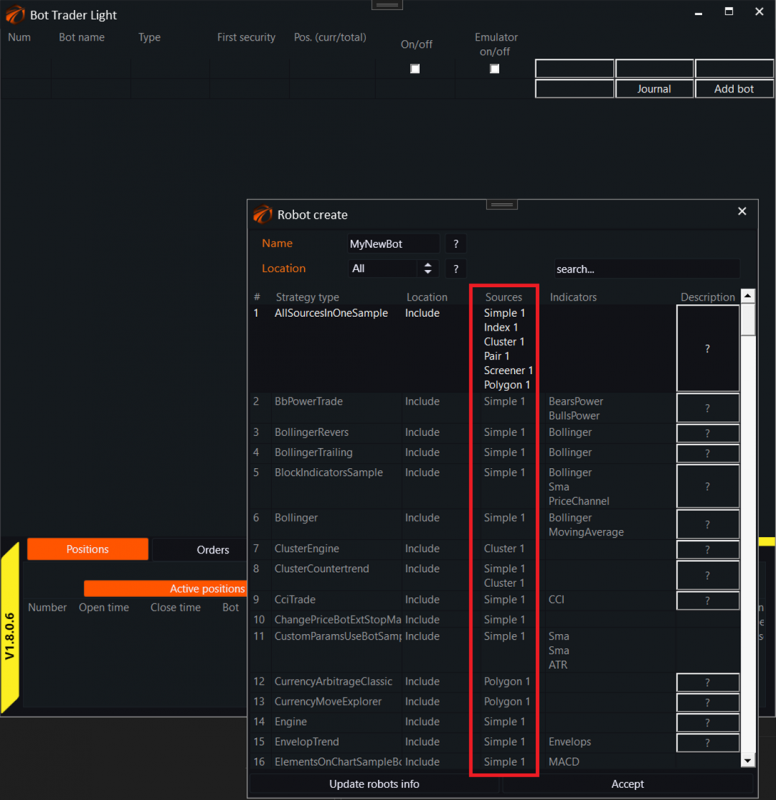
Let's create a robot with one Simple source:
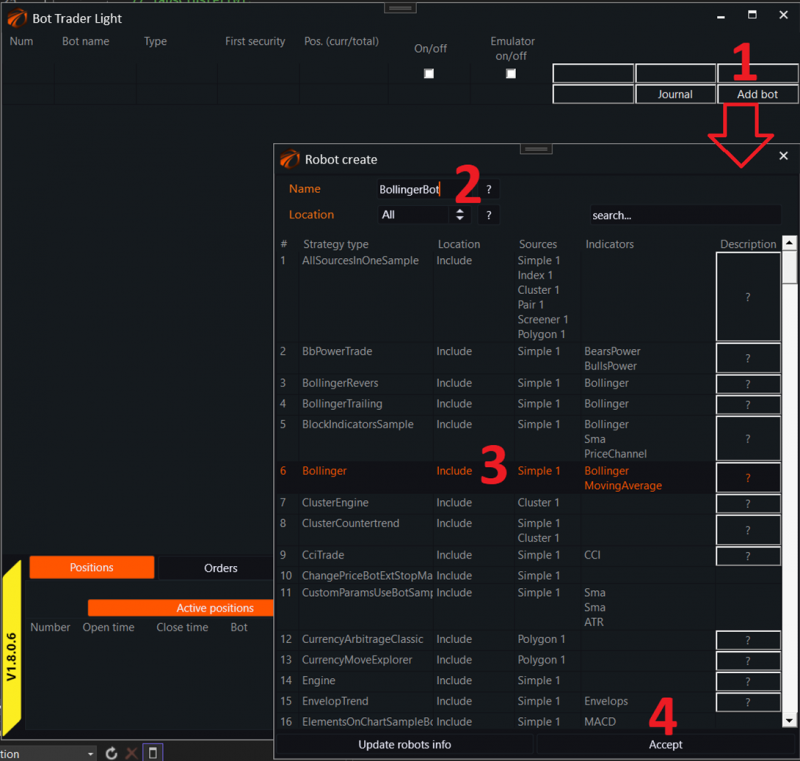
1. Click on the create robot button.
2. Give the robot a unique name.
3. Choose the robot. Let it be called Bollinger.
2. Connecting data to the robot.
After that, we can connect data to the robot:
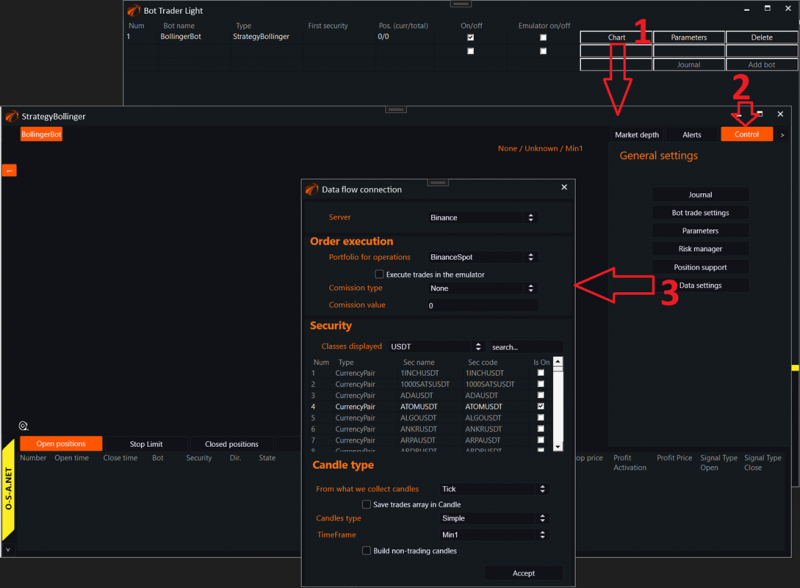
1. Open the robot's interface.
2. Select the control tab on the right.
3. Open the Data Settings menu and configure the desired instrument.
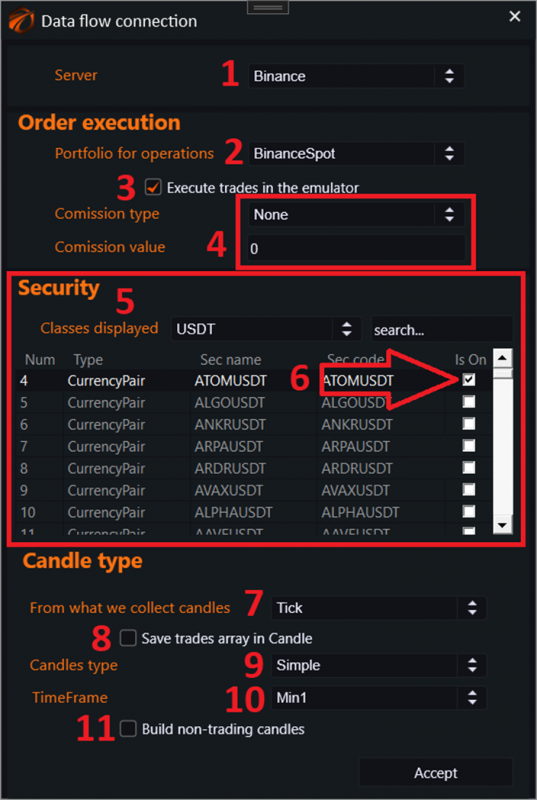
1. Choose the connection type. By this point, you should already be connected to some connector.
2. Choose the portfolio name. Surprisingly, there can be multiple portfolios on one platform.
3. Decide whether to execute trades in simulation mode.
4. Set up commissions.
5. Choose the trading instrument.
6. Don't forget to check the box next to the selected instrument.
7. How to generate new candles:
a. Tick - trade tape.
b. Market Depth - from the center of the order book. This may be necessary when there is very little trading volume for the instrument, but candles are needed.
8. Decide whether to store trade data within the candle. If yes, the trades making up the candle will be available in the code, but there will be a memory leak.
9. Candle type:
a. Simple - classic OHLC based on time.
b. Renko.
c. HeikenAshi.
d. Delta.
e. Volume.
f. Ticks.
g. Range.
h. Reversal.
10. Candle size.
11. Decide whether to include non-trading candles.
3. General.
After that, the robot will start receiving data:

1. Chart with previously requested candle data.
2. Tab panel with:
a. Open positions.
b. Pending orders for opening positions.
c. Closed positions.
d. Robot log.
3. Order book with the ability to quickly open positions.
4. Chart work.
When you right-click on the chart, you will see a pop-up menu:

1. Color scheme. White / Black.
2. Remove all chart areas, leaving only candles.
3. Show all chart areas, if any.
4. Menu for editing indicators.
5. Menu for deleting indicators.
6. Menu for creating a new indicator.
5. Order book and quick order placement.

1. Volume for quick position opening.
2. Price for quick position opening.
3. Buy order of "Market" type.
4. Buy order of "Limit" type.
5. Sell order of "Market" type.
6. Sell order of "Limit" type.
7. Cancel all orders from the market with this robot.
8. Open an extended order placement window.
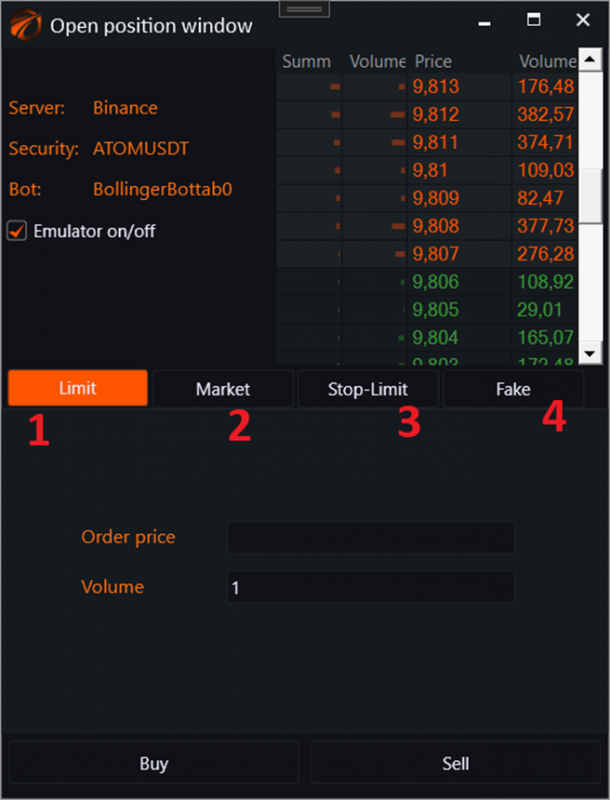
1. Limit - tab for placing limit orders.
2. Market - tab for placing market orders.
3. Stop-Limit - tab for placing orders through stop-limit orders. BuyAtStop/SellAtStop.
4. Fake - opening fake orders. Sometimes this is necessary for the robot to process an order that you placed manually on the exchange from another terminal.
6. Alerts.
The way to overlay various lines on the chart so that robots trade based on them.
There is a separate excellent article on this topic.
They are created by right-clicking on the alerts table:

7. Control tab.

1. Call the robot's journal. There are separate articles about this:
a. https://os-engine-eng.com/posts
b. https://os-engine-eng.com/posts
c. https://os-engine-eng.com/posts
2. Call the robot management windows. Parameters or individual robot management window. Depending on what is implemented in the robot.
3. Risk manager. Separate article.
4. Call the position management window. Separate article.
5. Call the data connection window. This window was discussed earlier in the text of this article.
Support chat. Link