Optimizer in OsEngine. Walk-Forwards.

Walk Forwards - one way to avoid overfitting the algorithm by testing its ability to adapt to new data periods.
1. Walk-Forwards is.
The essence of Walk-Forwards is depicted in the picture:
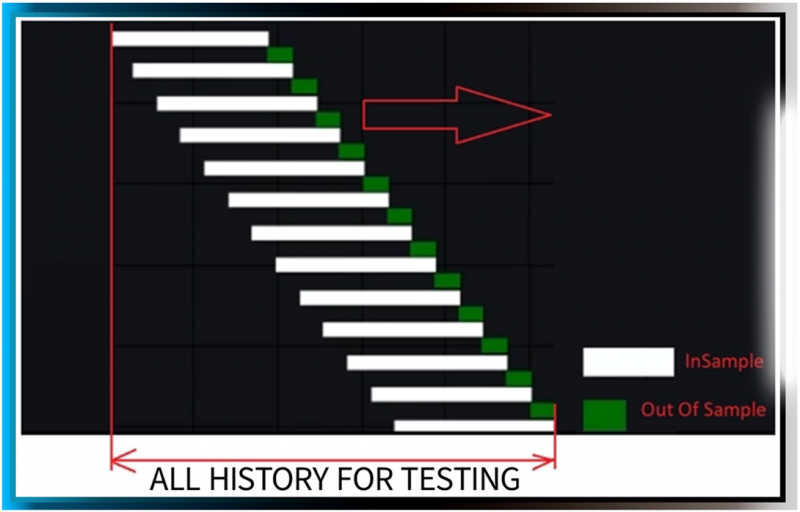 Fig. 1. Visualization of Walk-Forward testing.
During the "Walk-Forward" optimization process, we:
1. Divide the history into optimization stages.
2. Optimize the strategy on the In Sample period. Choose the best parameters in this segment.
3. Conduct control tests on the Out Of Sample period. See how the best parameters of the robot from the previous In Sample behave on previously unknown data.
4. Analyze the Out Of Sample results.
The essence is that the more profitable Out of Sample periods, the more robust the strategy.
2. Quick start with Walk-Forwards.
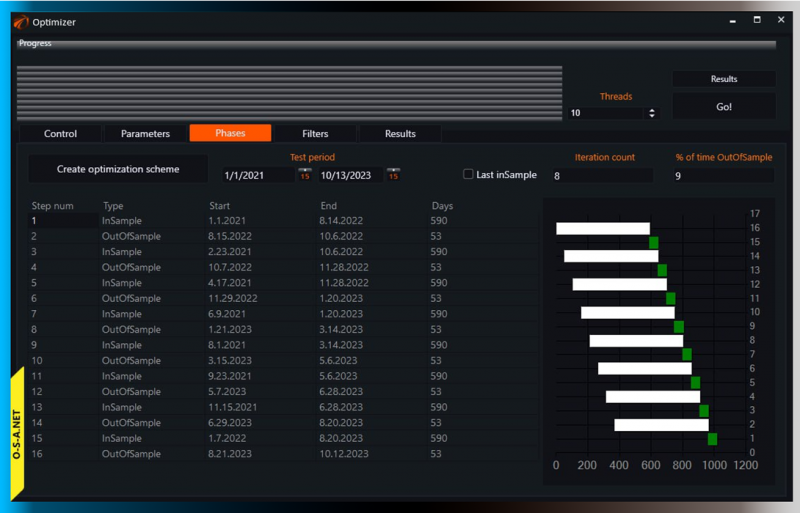 Fig. 2. Setting up optimization stages in OsEngine.
Recommendations for setting up Walk-Forwards stages.
1. In Sample period - from 700 to 1000 days.
2. Out Of Sample period - from 90 to 180 days.
We use Walk-Forward testing specifically for our trend robot portfolio.
One possible optimization scheme:
1. Conduct optimization at the beginning of the quarter (half-year).
2. Start trading robots without interfering with them for 3 (6) months.
3. Conduct optimization at the beginning of the next period (quarter or half year).
And so on.
3. Launching OsEngine.
To start working, launch the exe file with the platform.

We enter the main menu, select "Optimizer."
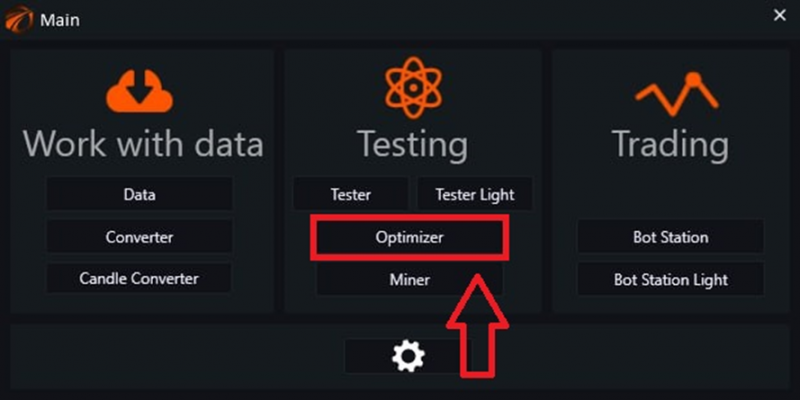
The Optimizer window opens, where we will work.

And we enter the data server window:
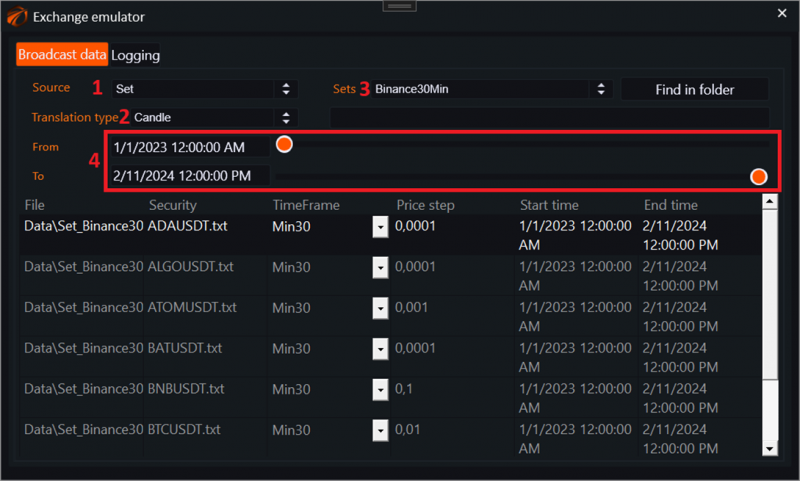
1. Select the source type. In this case, it is a set of data that was previously downloaded through OsData.
2. Choose the type of data transmission, in this case, candles.
3. Select the data set.
4. Configure data transmission time.
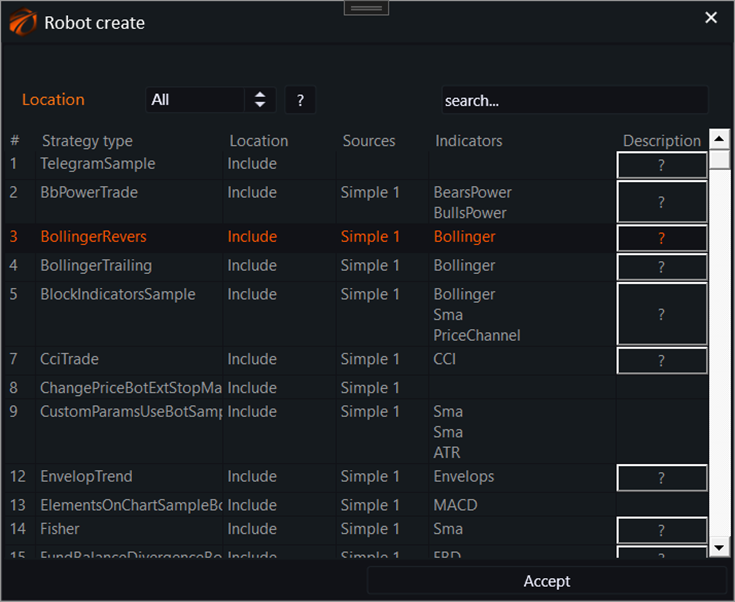
4. Select a robot for optimization.
In the main optimizer window, click the Select button:
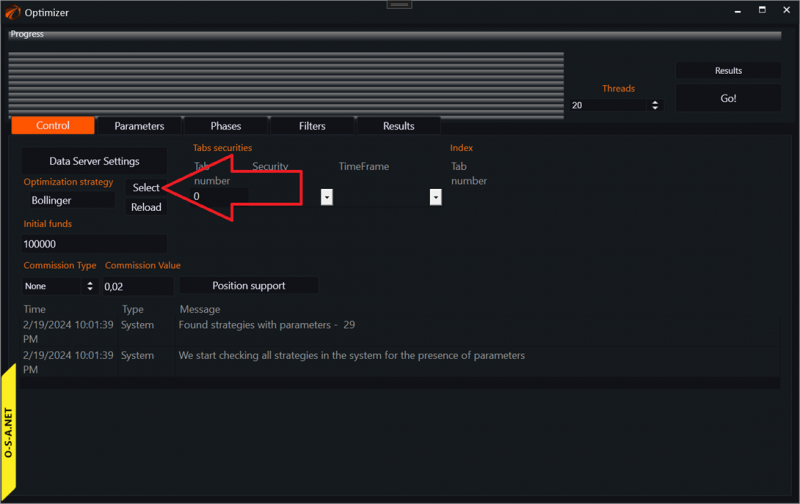
And choose the trading robot you want to optimize.
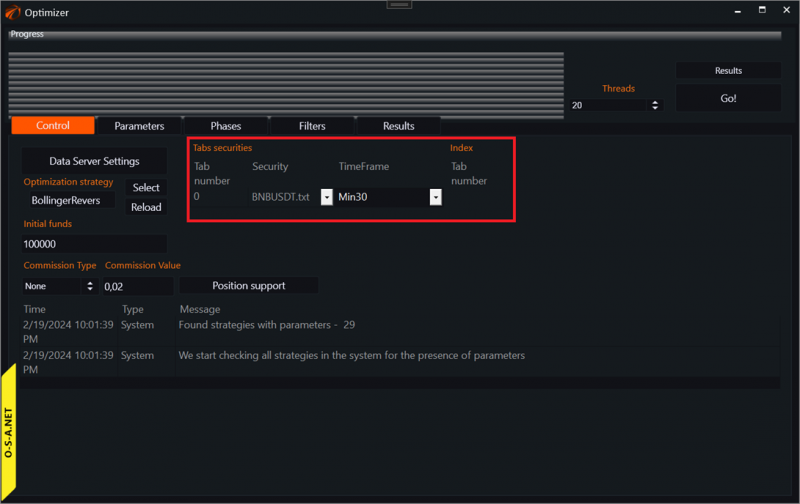
5. Select the security on which optimization will take place.
This is done in the main optimizer window.
6. Set up commissions for trades.
This is done in the main optimizer window:
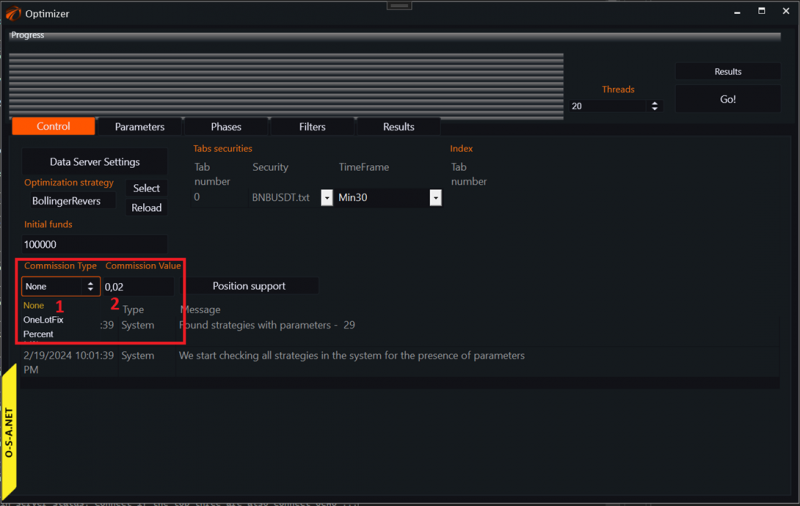
1. Select the commission type.
a. None - disabled.
b. OneLotFix - per contract.
c. Percent - as a percentage of the transaction amount.
2. Set the commission value.
7. Set up "Position Maintenance" in the robot.
This is done in the main optimizer window.
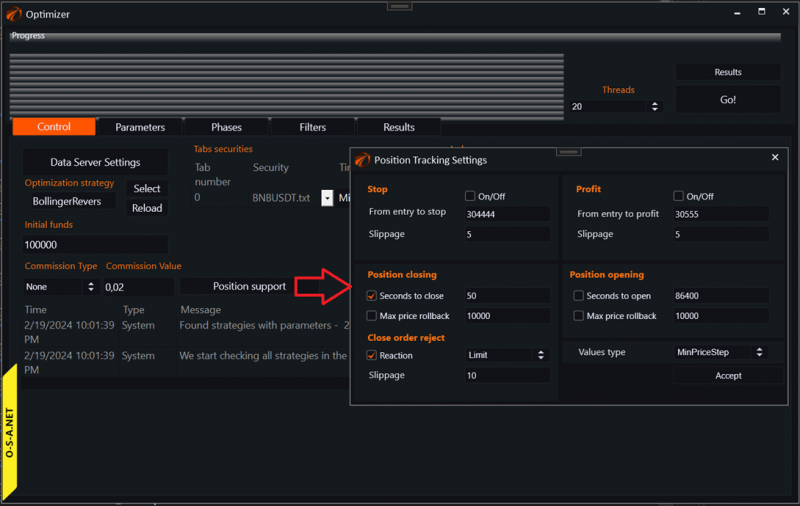
Link to an explanation of settings in the window.
8. Set up the parameters to optimize.
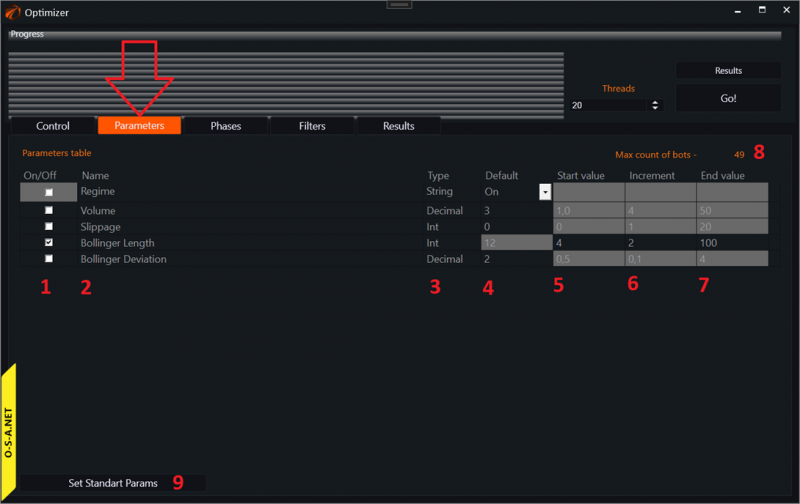
1. Column enabling and disabling parameters for optimization.
2. Parameter name.
3. Type of parameter to optimize.
4. Default value. Used if the parameter is not included in the optimization list.
5. Starting value for optimization.
6. Increment value step.
7. Final parameter value.
8. Number of optimizer passes to go through all possible parameter values.
9. Reset button for parameter values to the initial ones as written in the robot's source code.
9. Set up the optimization scheme for Walk Forwards.
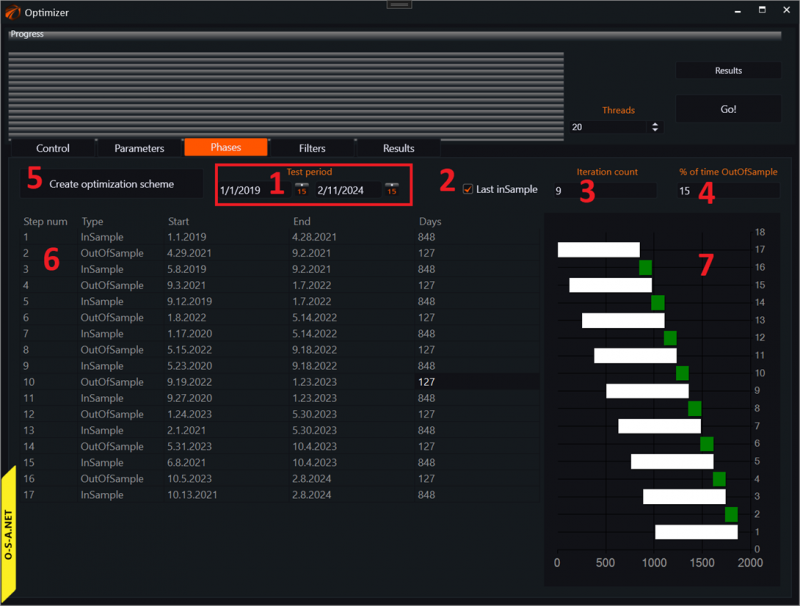
1. Data transmission time.
2. If enabled, the last stage will be In-Sample. The one from which you can take settings for real. If disabled, the last stage will be Out Of Sample.
3. Number of pairs In-Sample - Out-of-Sample.
4. Time on Out-of-Sample relative to In-Sample periods.
5. Create scheme button. Press after preliminary settings.
6. Table with optimization periods.
7. Visual representation of optimization periods.
10. Set up filters for results.
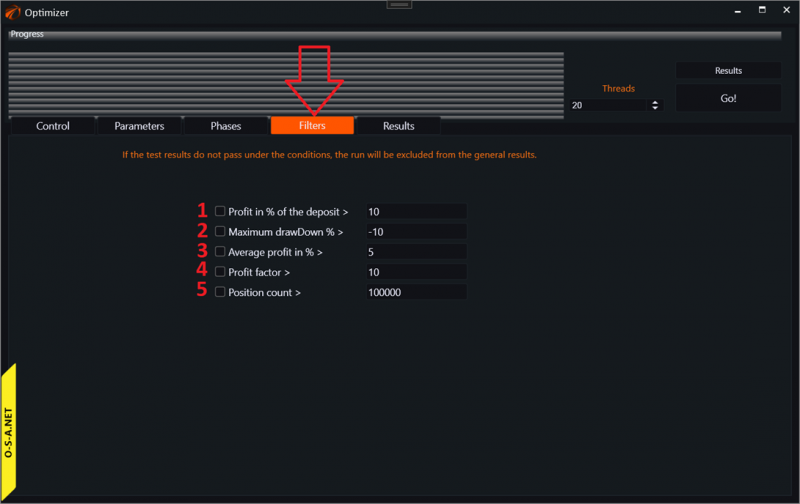
1. Show a pass in the final sample only if the final profit on the deposit in percent is greater than the specified value.
2. Show a pass in the final sample only if the maximum drawdown does not exceed the specified value.
3. Show a pass in the final sample only if the average profit per trade is higher than the specified value.
4. Show a pass in the final sample only if the profit factor is higher than the specified value.
5. Show a pass in the final sample only if the number of trades exceeds the specified value.
IMPORTANT!!! For Walk-Forwards, it's better not to include anything here!!!
11. Launching the optimizer.
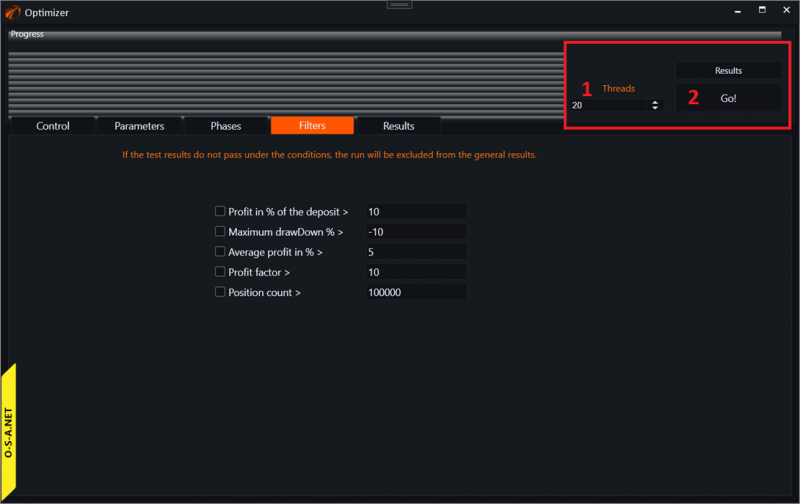
1. The number of threads that will be utilized during operation.
2. Start button.
After that, you will see the optimization process:
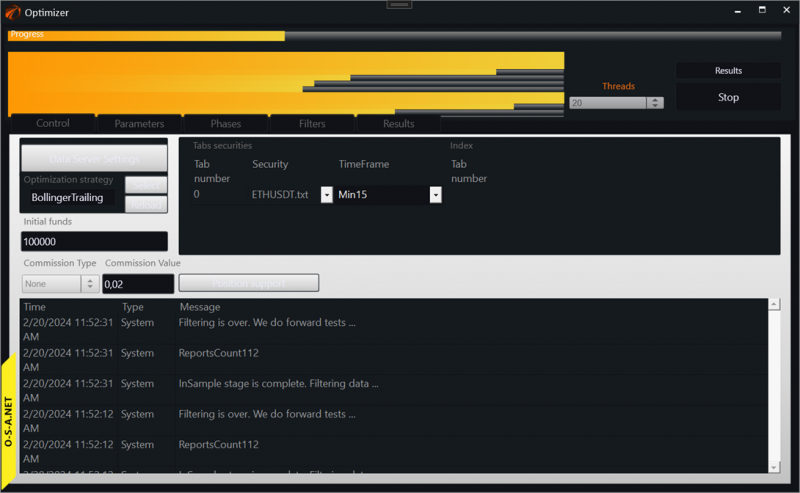
IMPORTANT!!! Do not set more threads than you have on your PC. If there is a lot of data and the robot is complex, this can result in a crash. This will cause your PC to freeze and errors to occur.
12. Viewing results. Series and Results.
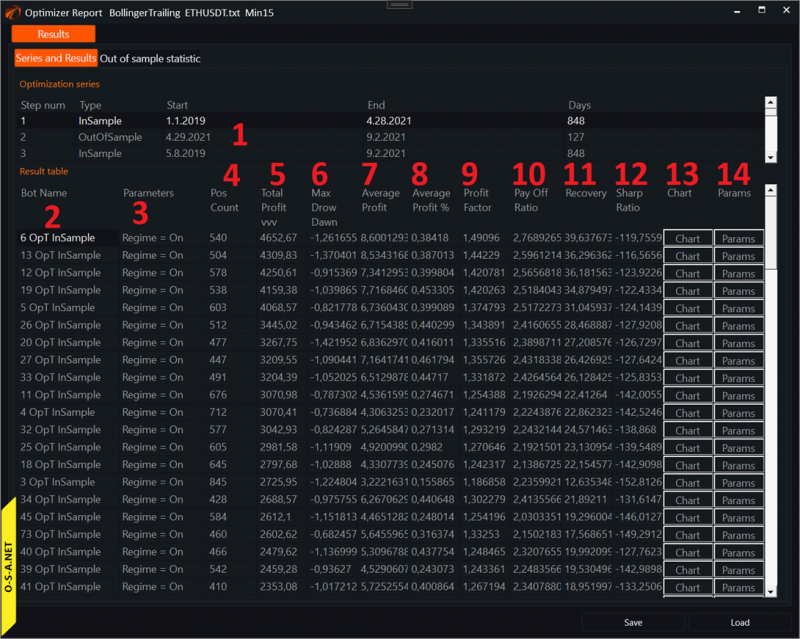
Here we see all the variations of the robot launched with different parameters on the same time segment.
1. Select the optimization segment to display.
2. Robot launch number.
3. Robot parameters. By hovering the mouse pointer over this field, you will see a list of robot parameters.
4. Number of positions. Left-click - sort by column.
5. Total absolute profit. Left-click - sort by column.
6. Maximum drawdown. Left-click - sort by column.
7. Average profit per contract in absolute terms. Left-click - sort by column.
8. Average profit per contract in percentage terms. Left-click - sort by column.
9. Profit factor. Left-click - sort by column.
10. Pay Off Ratio. Left-click - sort by column.
11. Recovery. Left-click - sort by column.
12. Sharp Ratio. Left-click - sort by column.
13. Chart - open the chart of this robot with current parameters. ATTENTION. To make this happen, you will need to wait because testing operations are required for chart opening.
14. Params - open the robot's parameter settings window.
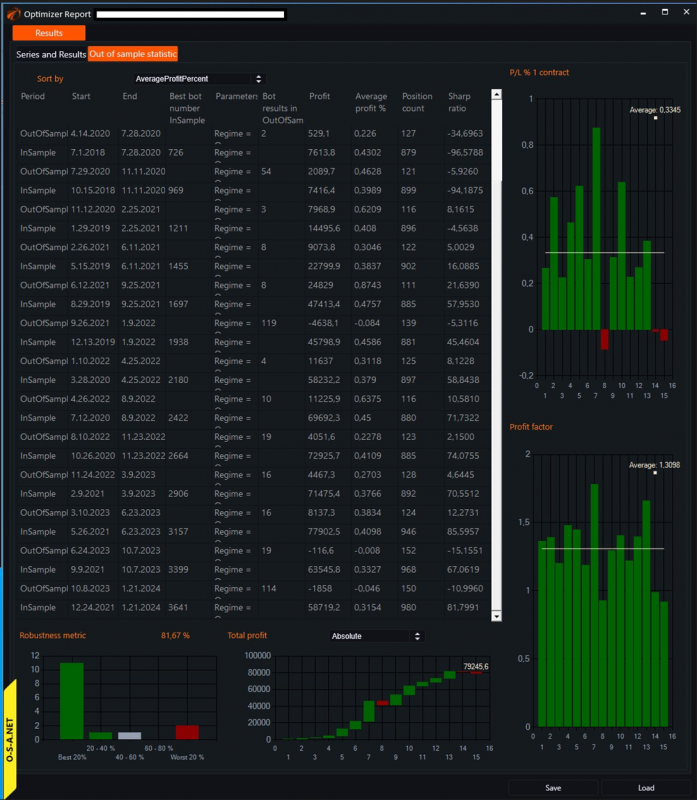
13. Viewing results. Out of sample statistic.
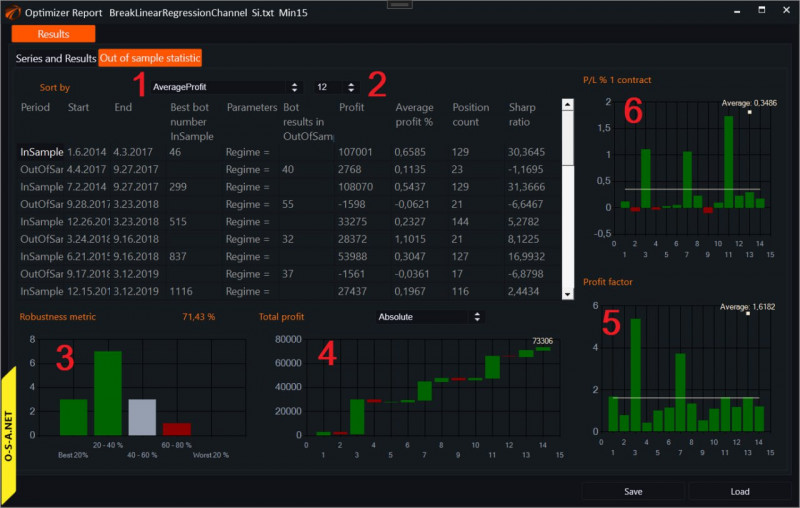
- Method for selecting the best parameters in the Out Of Sample period. By changing this setting, the robot recalculates all the graphs below based on the new best parameter.
- What result from the In Sample should we take to compare its results in Out Of Sample. 0 - the first. 1 - in one percent from the first. 5 - in five percent from the first. And so on.
- 2. Robustness metric - shows the stability of our strategy to new data. The higher, the better. There is a separate article in the FAQ about this.
- Total profit and individual profits for different Out Of Sample periods.
- Profit factor for Out of Sample periods.
- Profit per contract for Out of Sample periods.
14. Viewing results. What a GOOD report looks like.
And for your memory, so you have something to strive for. This is one of the strategies traded by our team:
Successful algorithms!
If something doesn't work out or if you have any questions, please write in the support chat, link.