Bot Station Light in Os Engine.

Good day. In this article, we will analyze the trading interface - «Bot Station Light».
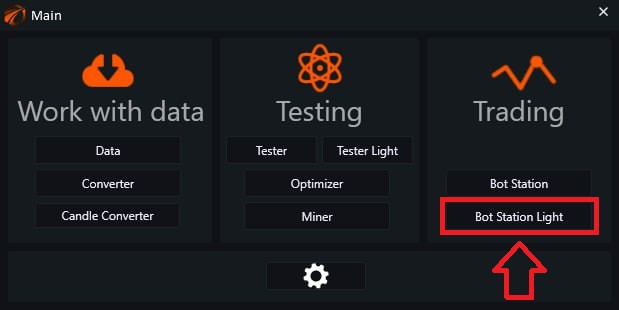
Open OsEngine:

And on the main menu panel, select «Bot Station Light»:
And the same panel opens as in the tester (вставить ссылку на тестер):

Add a bot.
As you can understand from the title, the «Add a bot» button is used to add robots:

After clicking, the robot creation menu opens:

1. «Name» - a field where you need to enter the name of our bot. It cannot be changed in the future.
2. Click on the arrows to select the location for creating the robot.
«Scripts» - when clicked, a list of robots that you have written or added yourself will open. There are also many examples of free ready-made scripts here. Feel free to use them!
3. «Built-in» - free robots that can also be used.
You can scroll through the entire list of available robots using the mouse wheel or scrollbar.
You can use the search if you need to find a specific robot or script.
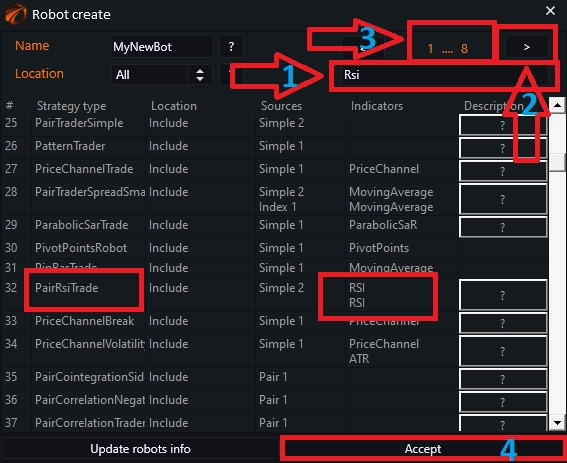
1. Enter the name or a single word from the title.
2. Use the arrows to flip through the pages that contain the word you entered in the search field.
3. The number of pages on which this word appears.
4. «Accept» - a button to confirm the selection.
If everything is done correctly, the robot will appear in the line:

Delete.
The button is used to delete robots. If trading is not yet active, simply click on the button next to the unwanted bot:
- «No» - cancels the selected command.
- «Accept» - confirms the selected action.

Connection servers.
1. Button that allows you to connect to the selected exchange:
2. Here you can find information on all the connectors available in OsEngine. To familiarize yourself with it, click on the «Support rules» button.
3. Deploy servers Automatically - automatic connection to the previously selected server upon restarting Os Engine. Check the box according to your preference.

Tab 1. «MOEX» - Connectors to the Moscow Exchange.
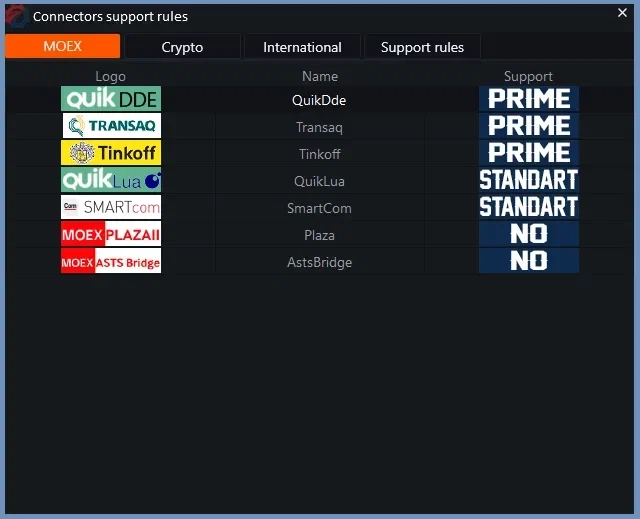
Tab 2. «Crypto» - Connectors to cryptocurrency exchanges. Here you can also get a discount on registration fees via the link.

Tab 3. «International» - Connectors to other exchanges.

Tab 4. «Support rules» - Explanation of support types.

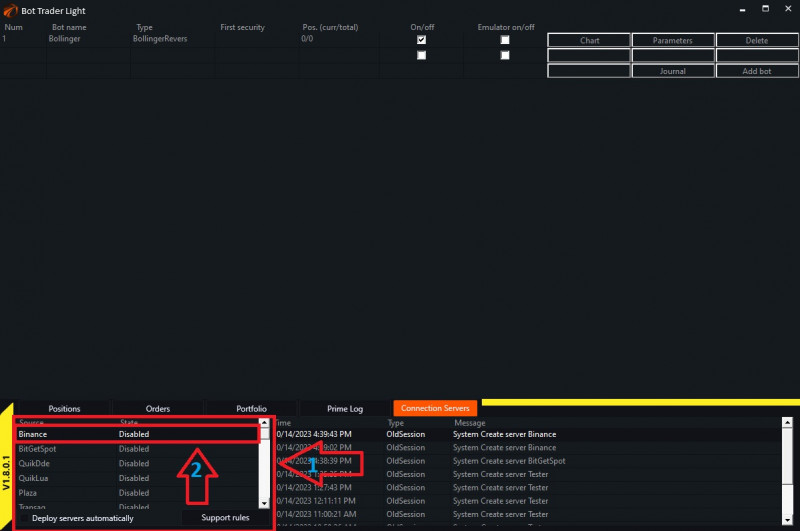
After reviewing, close the support window. And in the bottom left corner, you will see a list of all the connectors, in which
- Find the one you need.
- Double-click on the name with the left mouse button.
The connection settings window appears:
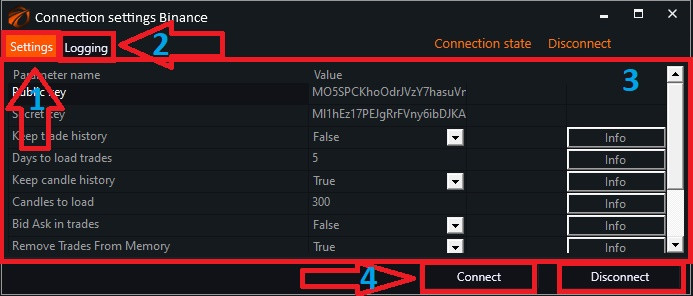
- «Settings» - a button that allows you to configure the connector.
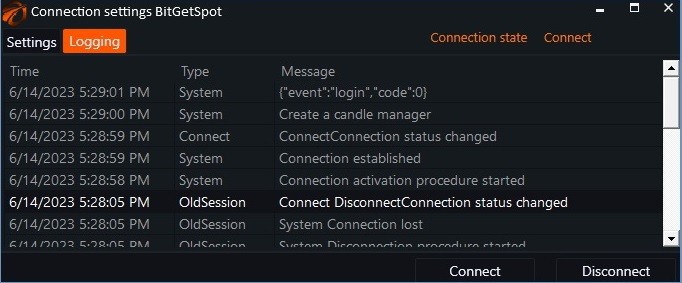
- «Logging» - when clicked, opens a window displaying the current connection status:
- Setting lines that can be adjusted according to your preferences and needs.
- «Connect» and «Disconnect» - buttons that allow you to enable and disable the connector.
When connected, the exchange name is highlighted in green:
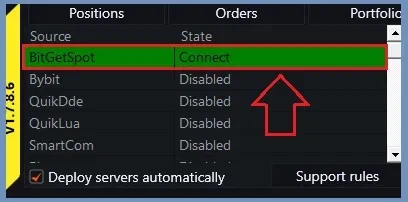
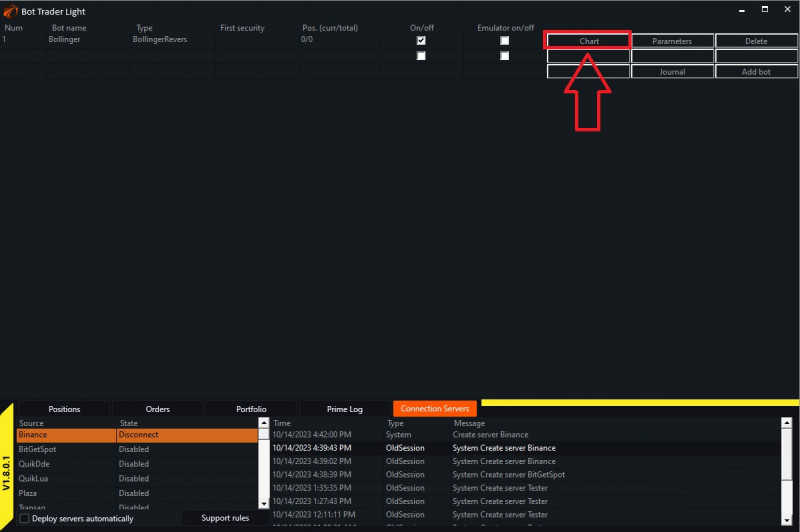
Chart.
Allows you to view all information about a specific robot and adjust its settings:
We enter the «Market depth» window. Since our robot is still turned off, there is no data here yet. To configure and enable the bot, click on «Control»:

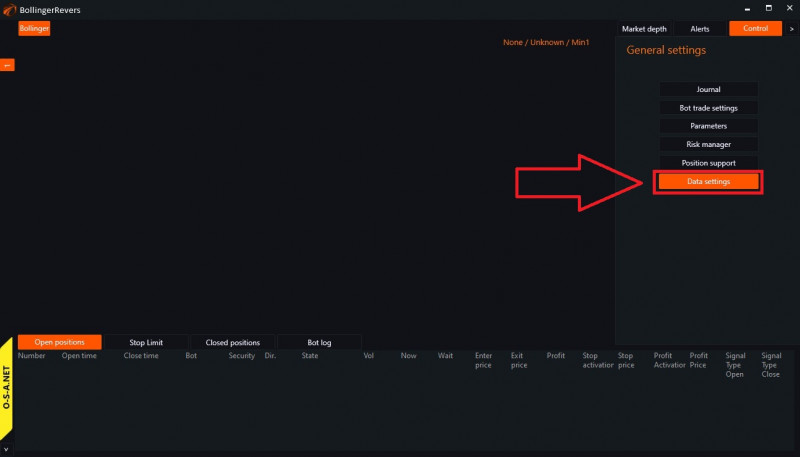
Data settings.
In order for the robots to trade, you need to configure and connect the data feed:
The data feed connection menu opens:

- «Server» - select the exchange (select the one you connected).
- «Portfolio for operations» - select the desired portfolio.
- «Execute trades in the emulator» - is the robot connected to real trading (if you want to launch the robot in combat, do not check the box).
- «Commission type» - has three modes: «None» - do not consider the commission; «OneLotFit» - commission per lot; «Percent» - commission in %.
- «Commission value» - individual for each exchange.
- «Classes displayed» - select the desired class.
- List of instruments - instrument traded by the robot (check the box next to the one you will trade).
- «From what we collect candles» - select the type you downloaded the data for.
- «Save trades array in Candle» - according to the user's preference (if yes, check the box).
- «Candles type» - select the desired.
- «TimeFrame» - also at your discretion.
- «Build non-trading candles» - according to the user's preference (if yes, check the box).
- «Accept» - confirm the selected settings.
«Risk manager» and «Position support» can be configured before enabling the robots if necessary (description here).

Parameters.
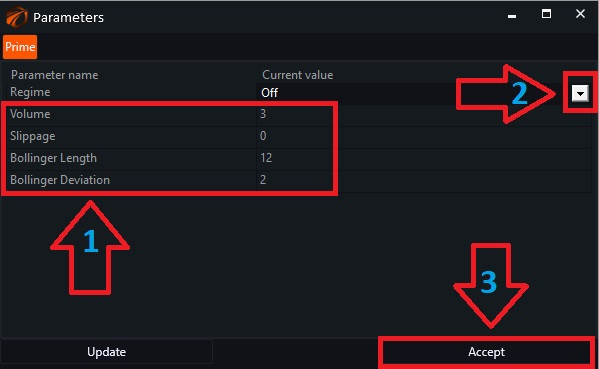
The robot can have parameters or not. If your robot has them, by clicking on the button with the corresponding label, you can configure them:

- Enter the parameters.
- Click on the arrow and switch the bot to the desired mode.
- «Accept» - confirm your actions.
After that, your bot will start trading!
You can quickly access the parameters, as well as quickly turn off the robot or turn it on again by clicking on the «Parameters» button in the main window:

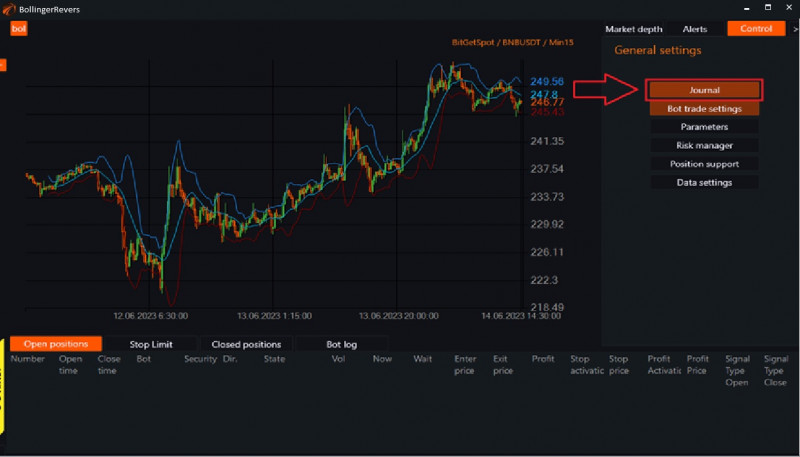
Journal.
Button that allows to view statistics for each individual bot:
Equity.
When opening the journal, we immediately go to the «Equity» tab. This tab displays graphical information about the account growth. It shows the total profit, as well as separately for long and short trades:

Statistics.

«Profit/Loss» - profit or loss from all operations.
«Profit/Loss %» - profit or loss as a percentage of capital.
«Position count» - ...
«Average trade time» - arithmetic average holding time of a position.
«Sharp ratio» is a measure of the efficiency of an investment portfolio and is calculated as the ratio of the average risk premium to the standard deviation of the portfolio.
«Profit Factor» - the ratio of the profit earned during a certain time period to the losses.
«Recovery» - shows how much the profit exceeds the depth of the maximum drawdown.
«Average P/L 1 contract» - average profit from movement in absolute terms without taking into account the volume. As if we enter with 1 contract. Without considering the volumes with which we enter. Only the movement of the instrument from entry to exit.
«Average P/L contract %» - average profit from movement in percentage terms without taking into account the volume. As if we enter with 1 contract. Only the movement of the instrument from entry to exit.
«Average P/L classic» - average profit from movement in absolute terms with volume taken into account.
«Average P/L portfolio %» - average profit from movement in percentage terms with volume taken into account, relative to the previous portfolio value.
«Profit positions» - ...
«Profitable %» - percentage of profitable trades out of the total number of trades.
«Average P/L 1 contract» - average movement of the instrument during our position. As if we enter with 1 contract.
«Average P/L 1 contract %» - average movement of the instrument in % during our position. As if we enter with 1 contract.
«Average P/L classic» - average profit from a position.
«Average P/L portfolio %» - average profit from a position relative to the portfolio.
«Maximum in a row» - number of consecutive profitable positions.
Loss positions - ...
Loss positions % - percentage of losing trades out of the total number of trades.
Average P/L 1 contract - the average movement of the instrument during the time we hold the position.
Average P/L 1 contract % - the average movement of the instrument in percentage during the time we hold the position.
Average P/L classic - the average loss from a position.
Average P/L portfolio % - the average loss from a position in relation to the portfolio.
Maximum in a row - the number of consecutive losing positions.
«Max drowdown % portfolio» - maximum drawdown of the portfolio in percentage.
«Comission amount» - ...
Drawdown.
This tab shows the dynamics of drawdown changes during the trading period:

Volume.

Open Positions.
This tab displays the current open positions that the bot is currently managing:

«Bot» - the name of the tab that carries out the trade.
«Security» - the name of the instrument.
«Direction» - the direction of the trade (Buy or Sell).
«State» - current status of the trade.
«Vol» - the volume of the trade by which the bot should enter the market.
«Now» - the executed volume.
«Wait» - the volume that is not yet executed but waiting for execution.
«Enter Price» - the price at which the bot entered the position.
«Exit Price» - the price at which the bot exited the position.
«Profit» - the profit margin from this trade.
«Stop Activation» - the activation price of a stop order. Once this price is reached, the order will be placed.
«Stop Price» - the price at which the bot will execute the stop order.
«Profit Activation» - the activation price of a profit order. Once this price is reached, the order will be placed.
«Profit Price» - the price at which the bot will execute the profit order.
Closed Positions.
This tab displays all closed trades, or in other words, a table of all executed trades:

You can view the overall journal for all active robots by clicking on the «Journal» button at the bottom of the list on the main page:

The individual and overall journal windows are very similar:

- Tabs for overall status.
- Robot list. We see the equity of the robots that are marked with checkboxes. You can mark one robot, or several, or even all. The ability to group robots and view equity of individual groups has appeared.
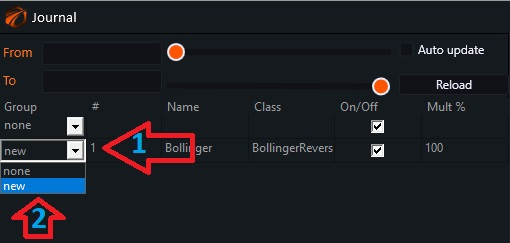
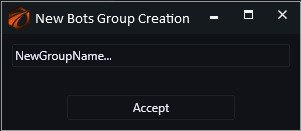
Open the white arrow and select "new". The window for creating a group of robots opens. Write the name, accept. Add the desired robots from your list to the created group.
3. You can now view trading data for a specific period by specifying the start and end dates.
4. Click «Reload».
Marketdepth.
1. Click the «Market depth» button next to any robot and observe the changes:

2. Robot name.
3. A robot may have multiple tabs. Clicking on the numbers allows you to switch between them.
4. Connector name/pair/timeframe.
5. Chart.
6. Panel for manual position control (if necessary).
To enter a position at any price, simply enter the volume.
To enter a position at a specific price, you need to specify the contract price. This can be done by entering a number in the corresponding field or by clicking on the desired price in the market depth.
«Revoke limits» button - cancels all active orders placed within this panel.
«More» - when clicked, opens the position opening window:
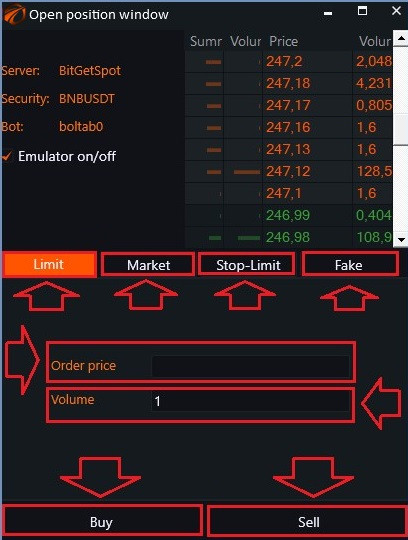
«Limit» - opens a position at a limit price.
«Market» - opens a position with a market order.
«Stop-Limit» - opens a position with a delayed order.
«Fake» - creates a position with a specific price and time but without actually placing an order on the exchange. It doesn't label the position as an emulator. In other words, the bot will treat such a position as if it were actually opened on the exchange.
«Order Price» - specify the price.
«Volume» - specify the volume.
«Buy» - buy.
«Sell» - sell.
7. Panel allowing to view the current status of positions.
8. Display line.
To open the position closing window, follow these steps (you should have an open position):
- In the main window, click on «Positions».
- Select «Active positions».
- Right-click on the position.
- Choose «Close selected».

The position closing window will appear:
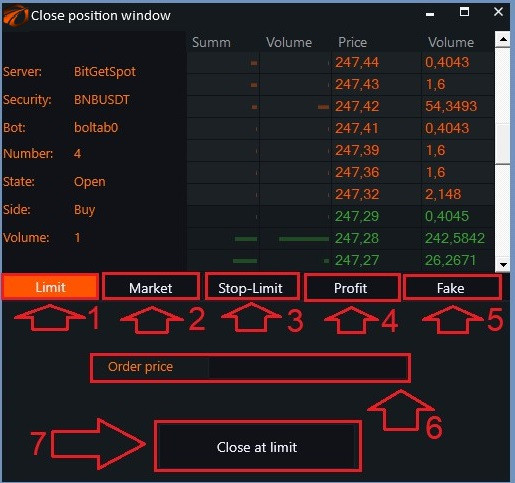
- «Limit» - close at a limit price.
- «Market» - close with a market order.
- «Stop-Limit» - close a position with a delayed stop order.
- «Profit» - close a position with a delayed profit order.
- «Fake» - close a position with a specific price and time but without actually placing an order on the exchange. It doesn't label the position as an emulator. In other words, the bot will treat such a position as if it were actually opened on the exchange.
- «Order Price» - field to specify the price.
- Confirmation button for the selected action.
Happy trading!
PS:
If something didn't work out or if you have any questions, please write to the support chat, link.