User Interfaces.

In this article, we will look at the user interfaces for Currency Arbitrage in OsEngine. All the logic for finding profitable sequences is embedded in BotTabPolygon and is configured through visual interfaces.
Currency arbitrage in OsEngine only works in real environments.
The Tester with Optimizer is disabled for these types of strategies. The entire logic of currency arbitrage is built entirely on order books, and signals are quite rare. Testing execution is impossible because instant liquidity fluctuates significantly. Therefore, tests are only possible in real environments.
Connecting to the trading server.
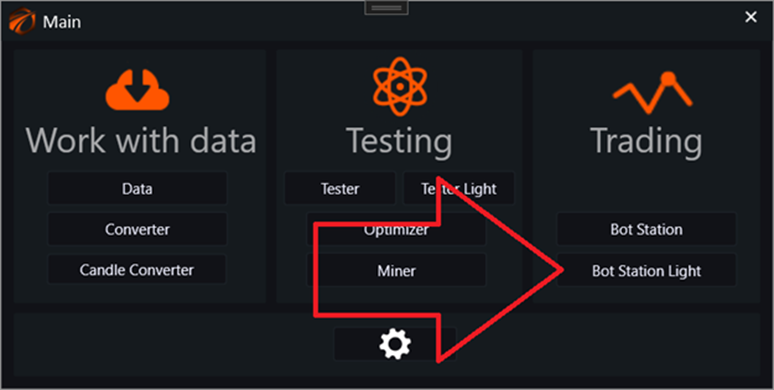
In the main menu, go to Bot Station Light:
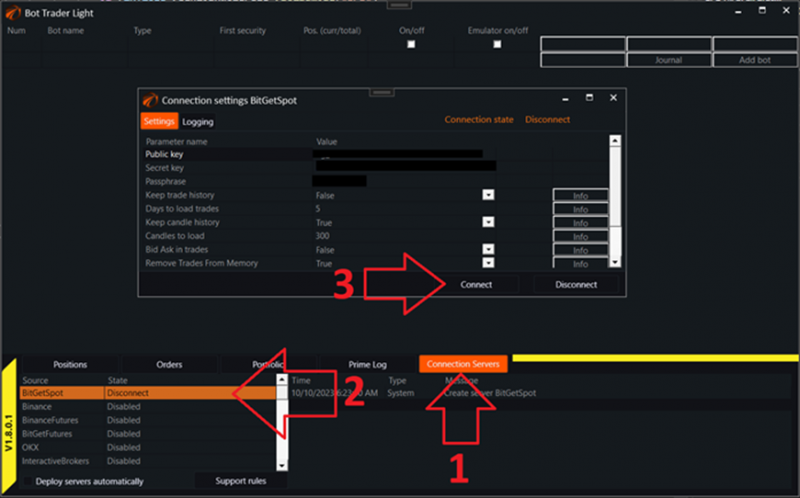
Connect to the server for spot trading of cryptocurrencies, in this case, it is BitGet:
By the way, if you register on BitGet using this link, your permanent discount on trading commissions will be 20%!
1. Select the menu for connecting to trading servers.
2. In the left table, find the server for connection.
3. In the server settings window, enter the access keys and click the Connect button.
Creating a robot for Currency Arbitrage.
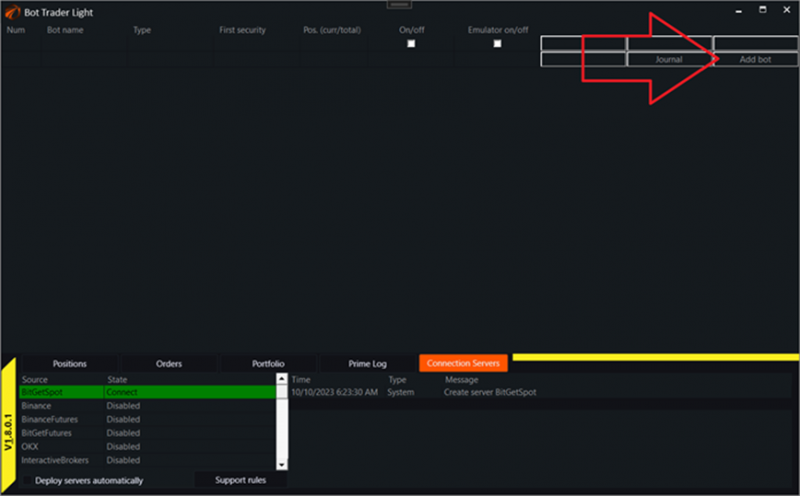
In the main application window, find the Add bot button and click on it:
A window for selecting robots will appear:

1. Enter a unique name for the robot in the system. It cannot be changed later.
2. The simplest robot for Manual Currency Arbitrage is called PolygonalEngine; select it by clicking on the robot name to highlight it in orange.
3. Note that in the list of sources for currency arbitrage robots, there should be a Polygon source. In this case, there is 1 item. Using this source, you can find other robots for Currency Arbitrage in the list.
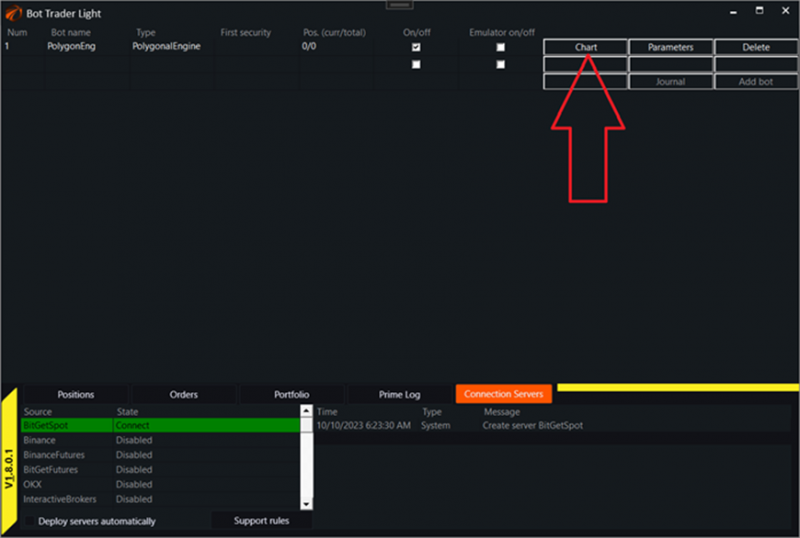
4. Click the Accept button. After this, the robot should be added to the main application window's table:

Robot Management Window for Currency Arbitrage.
To open the robot management window, click the Chart button in the main application window.
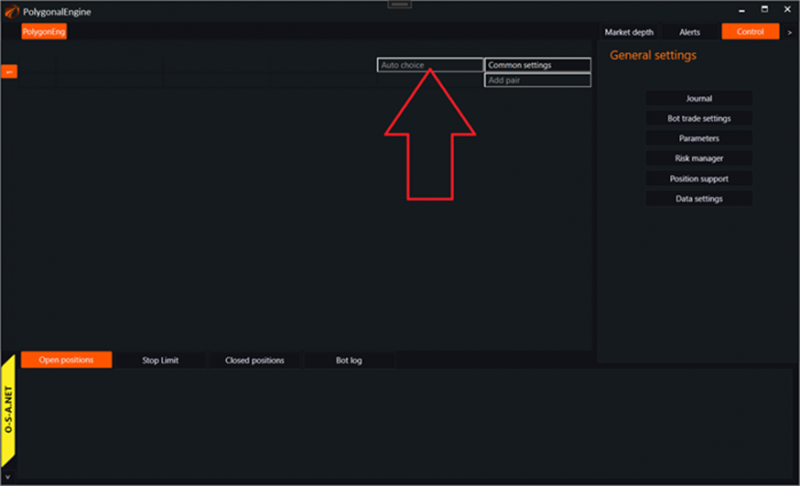
This will open the specific instance window of the robot:
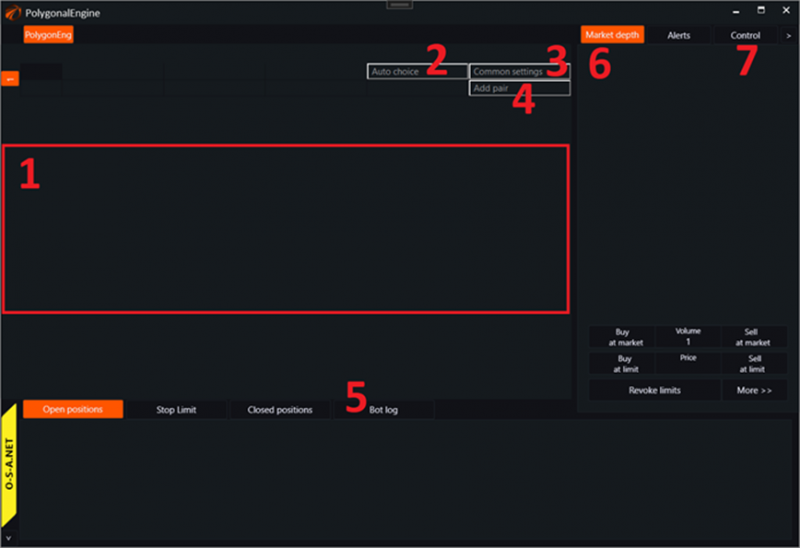
1. In this square, after all the settings, we will see a table with trading sequences.
2. The «Auto choice» button is responsible for the automatic selection of sequences.
3. The «Common Settings» button is for settings.
4. The «Add Pair» button allows adding an empty template for a pair, which will then need to be manually filled in.
5. In the Bot Log tab, you can view logs for all sequences.
6. Market Depth (order book) is not available in this interface for this type of robot.
7. In the Control tab, you can adjust some common modules working in pairs.
Control. General management functions for BotTabPolygonal.
Opening the «Control» tab will display settings that work in BotTabPolygonal:
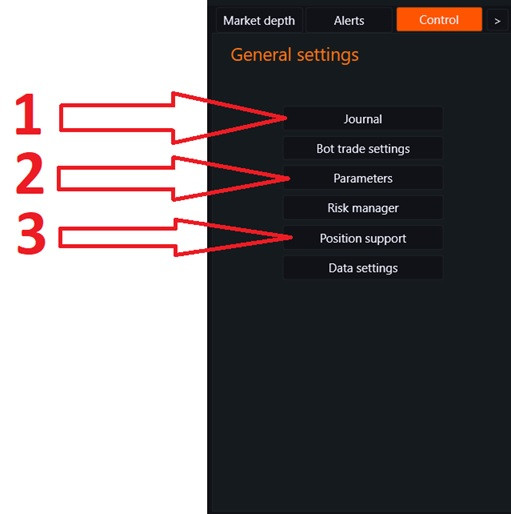
1. The "Journal" button opens a general journal for all connections. Additionally, if other sources are connected to the robot, such as BotTabSimple, BotTabScreener, etc., you will see the general journal along with them.
2. The "Settings" button opens the robot's settings.
3. The "Position Support" button opens the general position support settings for the BotTabPolygon source.
Common Settings for Sequences.
Common settings for sequences can be opened from the main robot interface by clicking this button:
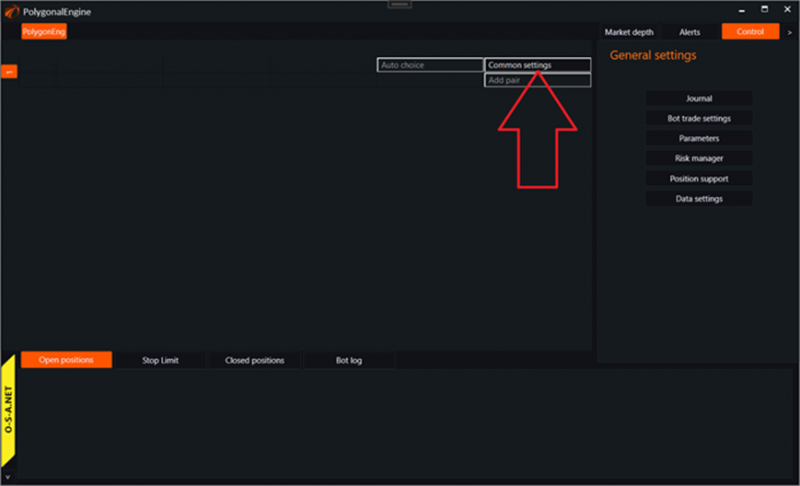
This will open the common settings window:
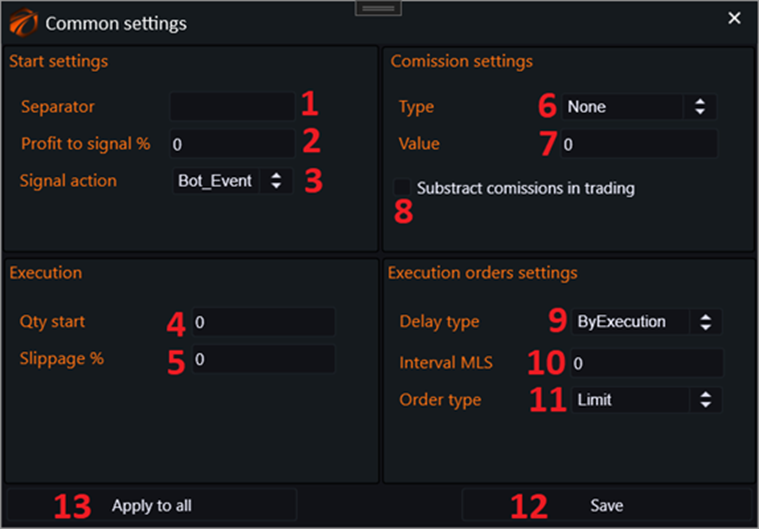
1. Separator for the names of instruments to ensure the correct logic for selecting currencies. This is necessary on exchanges where this separator exists. Sometimes this can be «@» or «_» (underscore). For example, Binance and BitGet do not have a separator.
2. Profit size in % for the instrument pair, after which a signal should occur.
3. The type of signal that will be sent after reaching the profit % for the pair from the previous setting.
• Bot_Event – a signal will be sent to the robot through the corresponding Event, to which you can subscribe from the code.
• Alert – a window with a record will be opened. A record will indicate that a profit excess has occurred for a specific pair.
• All – both previous signals will be sent.
• None – no reaction.
4. Initial volume for the starting currency in the pair.
5. Slippage for Limit orders, if the order execution type is Limit.
6. Commission type to be considered when calculating the profit for the pair.
• None – will not be considered.
• Percent - the commission will be calculated in percentages (recommended to include in any case).
7. Commission size in %, which will be taken into account when calculating the profitability of the pair in case the commission is included (recommended to set no less than 0.05%).
8. Whether to subtract the commission size from the volumes in the pair of instruments. (Recommended to include in any case, to avoid errors in volume calculation).
9. Type of delay when placing orders for the pair of instruments.
• ByExecution - the execution mechanism will wait for the execution of the last placed order before moving on to placing the next one.
• InMls - in milliseconds.
• Instantly - instantly place all three orders in the link without delays.
10. Interval between orders, specified in milliseconds in case the delay type is specified as InMls.
11. Order type for trading.
• Limit - executed at a specific price.
• Market - executed at any price that will be in the order book.
12. Save changes button. And all settings will only apply to newly created pair.
13. Apply to all button. The settings from this window will be saved and then applied to all existing pairs of instruments.
Automatic selection of pairs.
This functionality is needed so that you don't have to manually enter hundreds of sequences of pairs for trading that exist on the platform.
Called «automatic pairs selection» by this button:
IMPORTANT!!!
All further steps should be done sequentially and carefully, otherwise the pairs will not be selected.
Stage 1. Selection of base instruments.
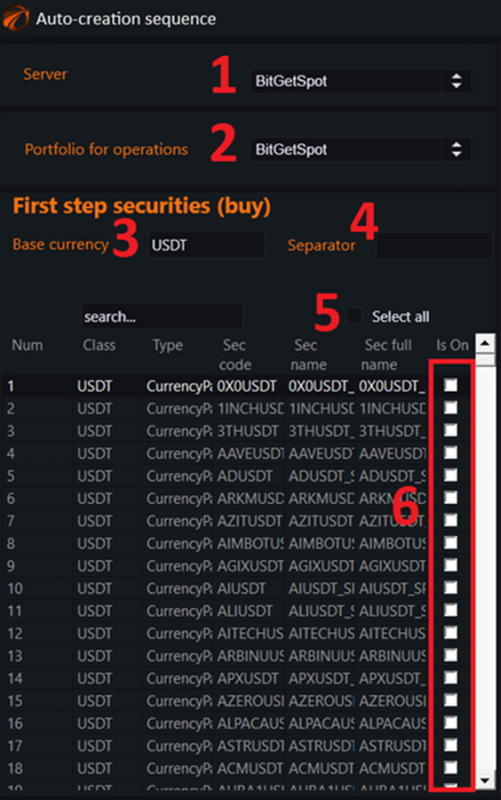
1. Select trading server.
2. Select portfolio for operations.
3. Select the base currency for the pairs.
4. Separator for the name of securities, so that the currency selection logic works correctly. This is necessary on exchanges where this separator exists. Sometimes it could be «@» or «_» (underscore). For example, there is no separator on Binance and BitGet.
5. Select all button.
6. To move on to the next stage of creating pairs, checkboxes must be ticked here!
Stage 2. Selection of available currencies for transfer.
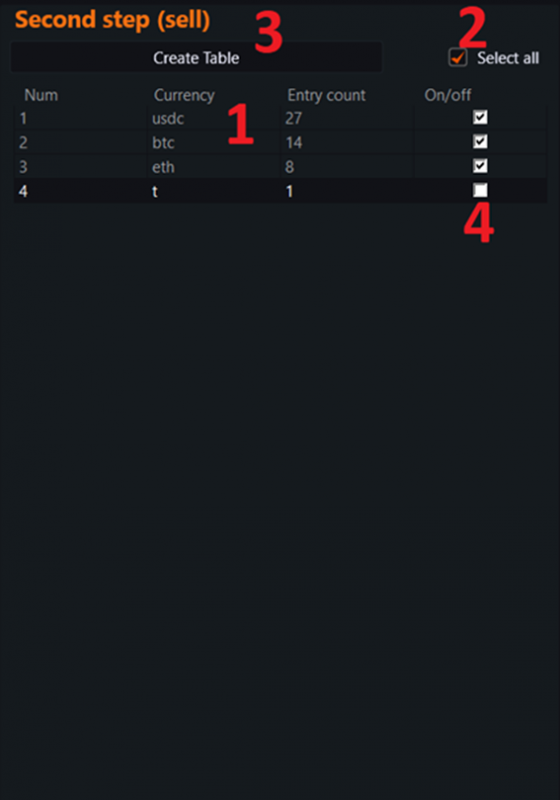
1. Available currencies for transfer, from which there is an exit to our base currency.
2. Select all button.
3. Create table button.
4. Strange symbols may end up in this table, which should not be chosen as transfer currencies.
5. IMPORTANT!!! To move on to the next stage, there should be at least some currencies selected in this table.
Stage 3. Formation of the final sequence table.
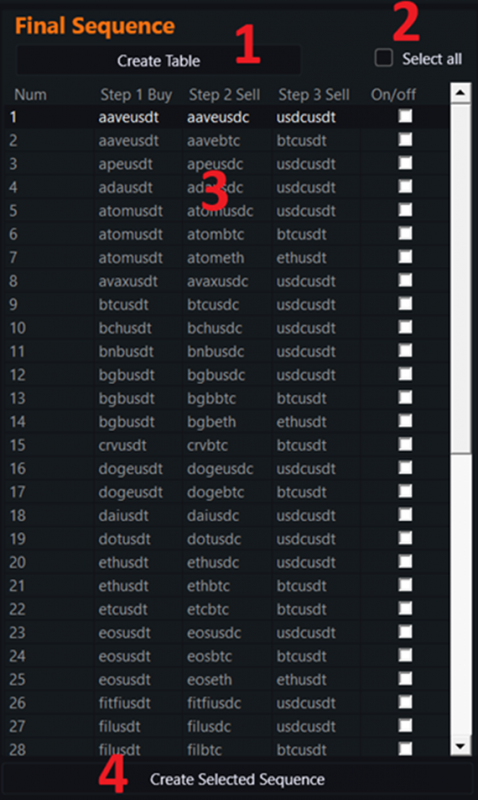
1. Create sequence table button.
2. Select all sequences button.
3. The sequences themselves formed as a result of this stage.
4. Create sequences in the robot button. All selected sequences will be created, which you will immediately see in the robot's interface.
The result should be as follows.
A fully formed table of possible sequences:

Table of sequences in the robot window.
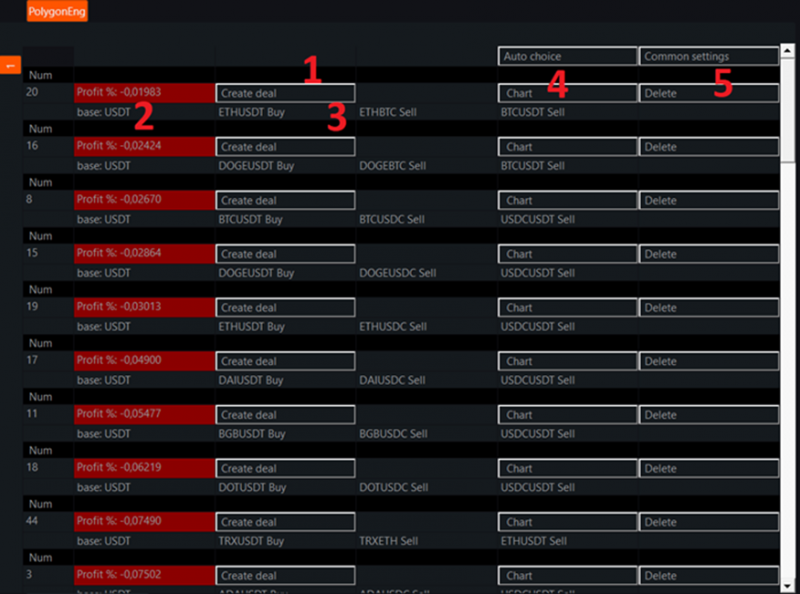
1. Button for creating a series of orders for the pair. Starts the procedure of trading the pair in accordance with the internal settings.
2. Base currency of the pair and expected instant profit for the pair at the moment.
3. Sequence of three instruments that will be used in the trade, indicating the side of the transaction that will be conducted for each one separately.
4. Button that opens a separate chart of a specific sequence.
5. Button that deletes the sequence.
Separate sequence window.
Opens by pressing the Chart button in the sequence table:
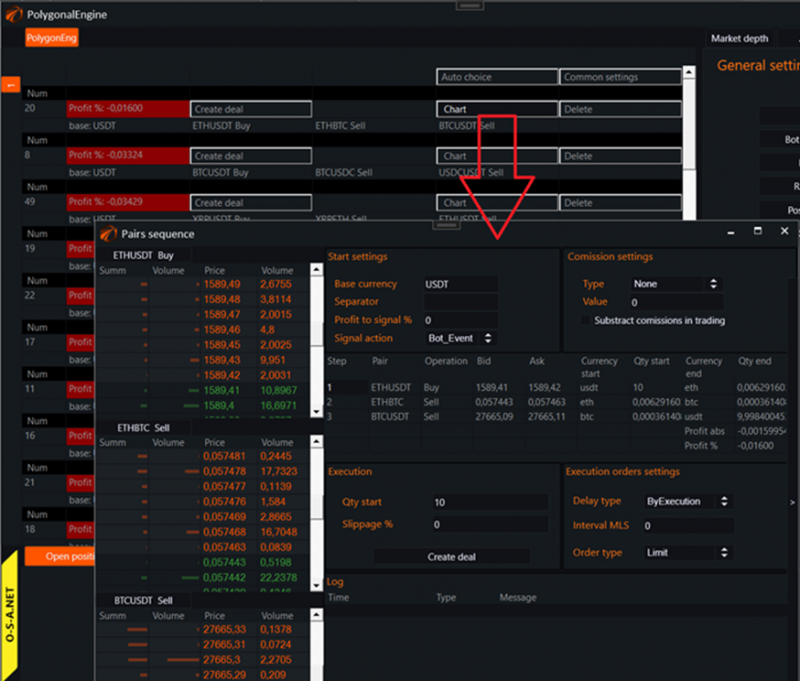
The window itself looks like this:
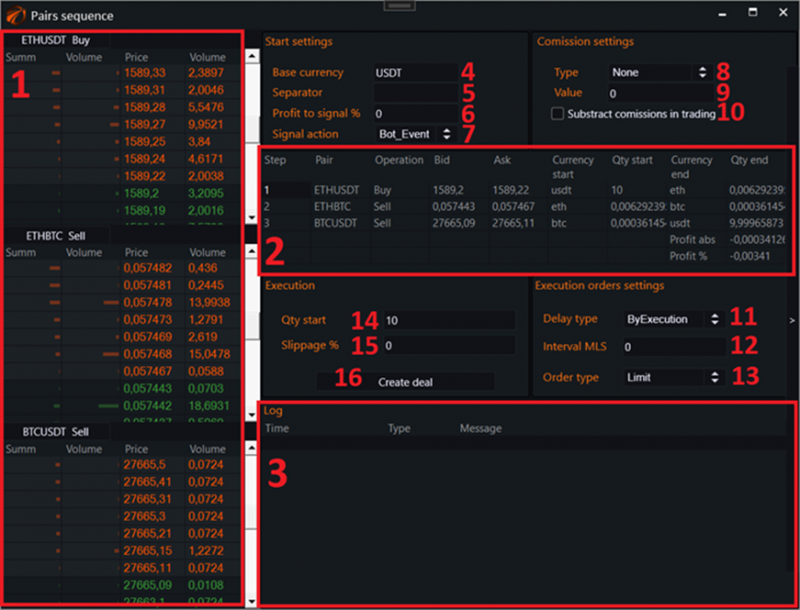
1. Order book for the selected instruments. Also, there are buttons here with which they can be changed.
2. Table of sequence of operations for the pair of instruments.
3. Log of this pair. When trades are made on it, there will be records here.
4. Base currency. It is also the starting one. From which currency the transfer for the pair will start.
5. Separator for the name of the papers, so that the logic of choosing the currency works correctly. This is needed on exchanges where this separator exists. Sometimes it can be «@» or «_». For example, Binance and BitGet do not have a separator.
6. Profit size in % for the instrument pair, after which a signal should occur.
7. Type of signal that will be sent after reaching the profit % according to the previous setting:
- Bot_Event – a signal will be sent to the robot through the corresponding Event that can be subscribed to from the code.
- Alert – a window with a record will be opened, indicating that there has been a profit excess for a certain pair.
- All – both of the previous signals will be sent.
- None – no reaction will occur.
8. Type of commission to be considered when calculating profit for the pair:
- None – will not be taken into account.
- Percent – the commission will be calculated in percentage (recommended to be included in any case).
9. Commission size in % to be considered when calculating profit for the pair, in case commission calculation is enabled (recommended to be set at no less than 0.05%).
10. Whether to subtract the commission size from the volumes in the instrument pair (recommended to be included in any case to avoid errors in volume calculation).
11. Type of delay in placing orders for the instrument pair:
- ByExecution – the execution mechanism will wait for the last placed order to be executed before moving on to placing the next one.
- InMls – in milliseconds.
- Instantly – instantly place all three orders for the pair without delays.
12. Interval between orders, specified in milliseconds, in case the delay type is set as InMls.
13. Type of orders for trading:
- Limit – executed at a specific price.
- Market – executed at any price available in the market.
14. Initial volume for the starting currency in the pair.
15. Slippage for Limit orders, if the order execution type Limit is chosen.
16. Button for creating a series of orders for the pair. Initiates the trading procedure for the pair according to the internal settings.
If you have any difficulties or questions, please write to the support chat. Link