Pair Arbitrage. Trading manually + Visual interfaces in OsEngine.

In this article, we will get acquainted with the interfaces for pair arbitrage that are available in OsEngine. To repeat everything that is written in the article, it is recommended to download data using OsData.
The dataset consists of 2 - 10 securities. The timeframe is 15 minutes. Data can be fetched from the Moscow Exchange or Binance.
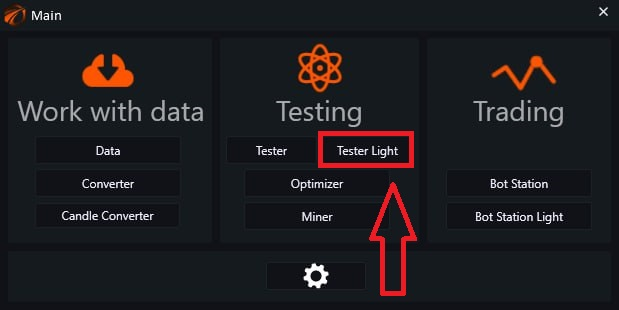
1. Launch the tester.
Apart from the description below, you will first need to download the data and then know how to enable it in the tester, by starting the exchange emulator. If you do not know how to do this yet, go download the data and learn how the tester works:
1) OsData and data.
2) How to connect data to the tester.
2. Activate the robot. CorrelationNegative.
In the tester window that opens:
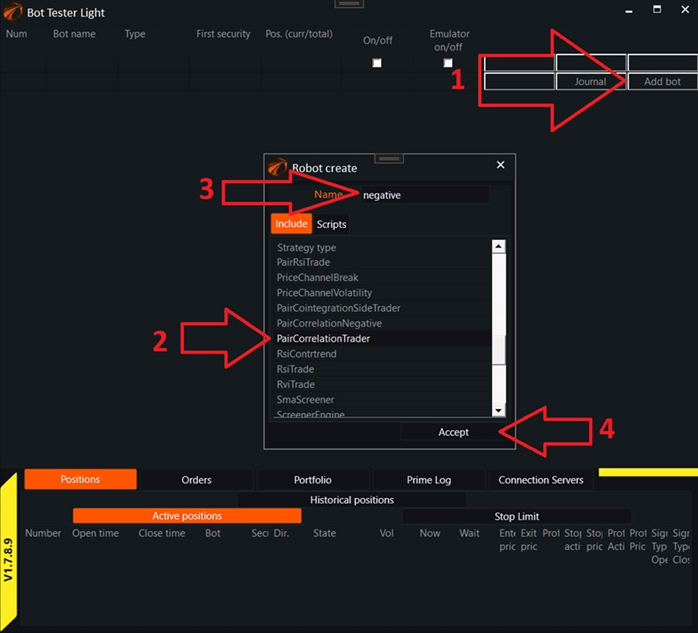
1) Click on the button to add a robot.
2) Choose the robot «PairCorrelationTrader».
3) Name it somehow. This is mandatory! This name cannot be changed later.
4) Click the «Create» button.
After that, you can see a new record in the table with this robot:
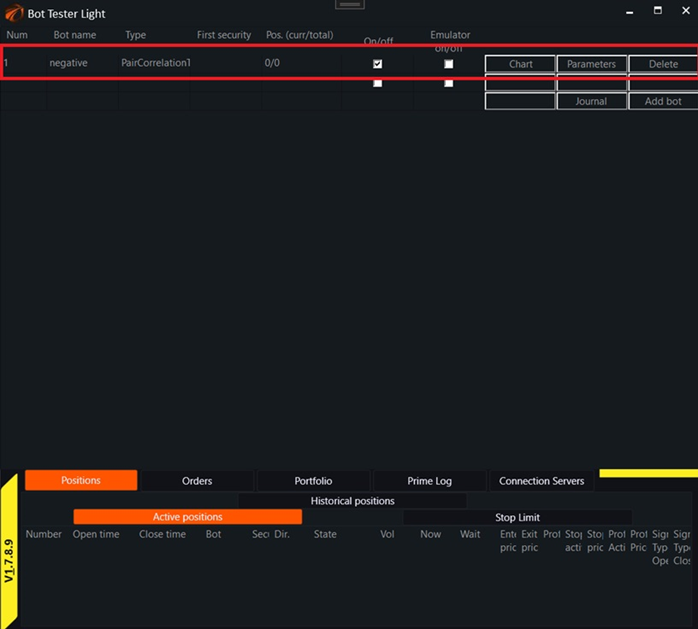
Then you can click on the Chart button to see what's inside.
3. Summary table of pairs. Empty.
An individual control window for the robot for pair trading opens in front of us:
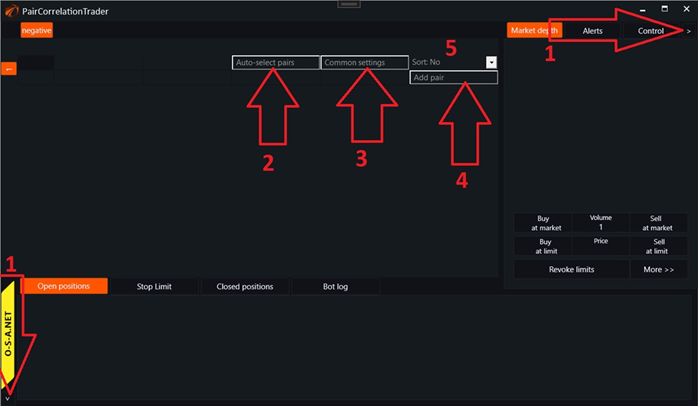
1. It is recommended to close unnecessary panels. They are not used in pair arbitrage. This can be done by clicking the respective buttons in the corner of the window.
2. The button to open the Pair Auto-selection window. This window simplifies the creation of a long list of pairs, if there are many of them.
3. The «Common settings» button opens a window for common settings for pairs. This window simplifies and speeds up the setup of indicators and methods for opening positions for pairs since you can apply settings to all pairs that have already been created at once in this window.
4. The button for creating a pair. It creates an empty pair with default settings.
5. Table sorting type.
- a. No – Sorting is disabled. Pairs will be displayed according to their numbers.
- b. Side – The current deviation from the lines on the deviation chart (cointegration). Up (deviation above the current line) will be displayed at the top. Down (deviation below the current line) will be displayed next. No – will be displayed at the bottom of the pair.
- c. Correlation – pairs will be displayed according to the size of the correlation. The higher the correlation, the higher the position of the pair in the table.
4. Adding pairs manually.
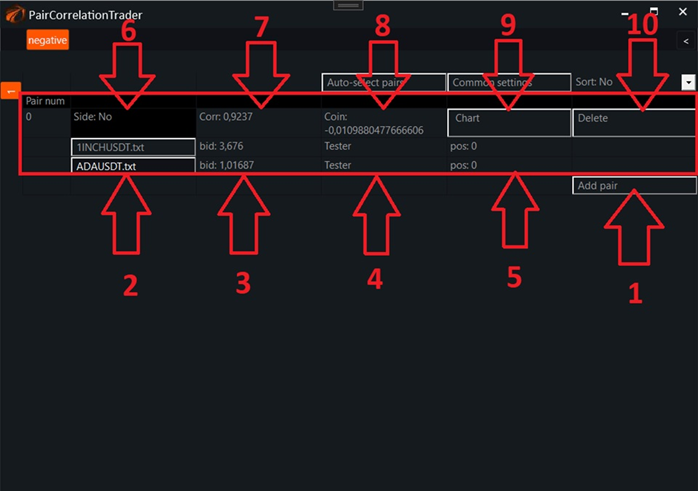
1) Button that creates an empty pair that needs to be configured.
2) Buttons to call up instrument settings for the pair.
3) Bids for the first and second instruments.
4) Server type for the instruments.
5) Current positions for the instruments.
6) Current deviation between the instruments relative to the lines on the deviation chart (cointegration).
7) Current correlation value between the instruments.
8) Current deviation value from the deviation chart (cointegration).
9) Call pair window.
10) Delete pair button.
5. Auto-pair selection window.
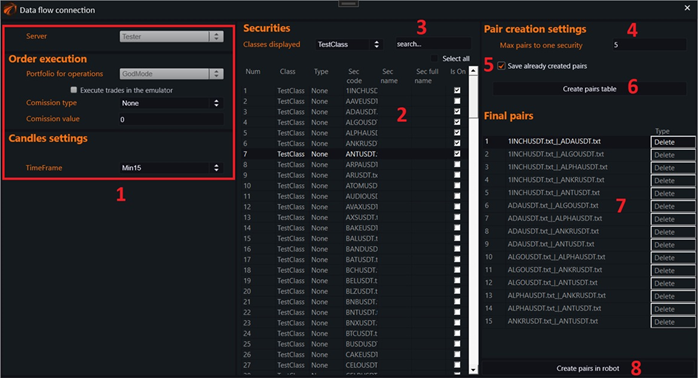
1) Trading server, commission, and timeframe selection menu.
2) Selection of securities from which pairs will be formed. Selected by checking the box in the right column.
3) Security search menu.
4) Maximum number of pairs for each selected security.
5) If active, the «Final pairs» table will display the pairs already created.
6) Create a list of pairs that are obtained from the selected securities.
7) Preliminary list of pairs that can be created in the robot.
8) Button to create pairs from the above list, already in the robot.
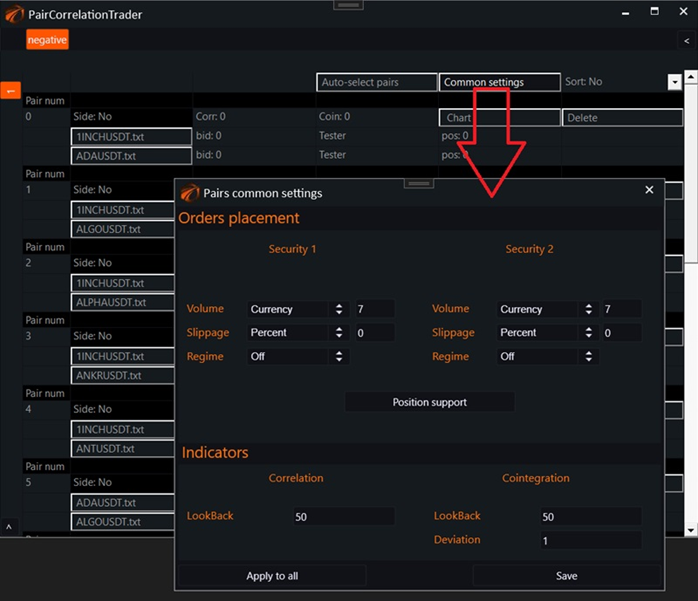
6. Common settings window.
There can be many pairs and they can have common settings. If you need to change some of them for all pairs simultaneously, then it makes no sense to open settings for each pair. In this case, you should use the common settings window.
It opens by clicking the «Common settings» button:
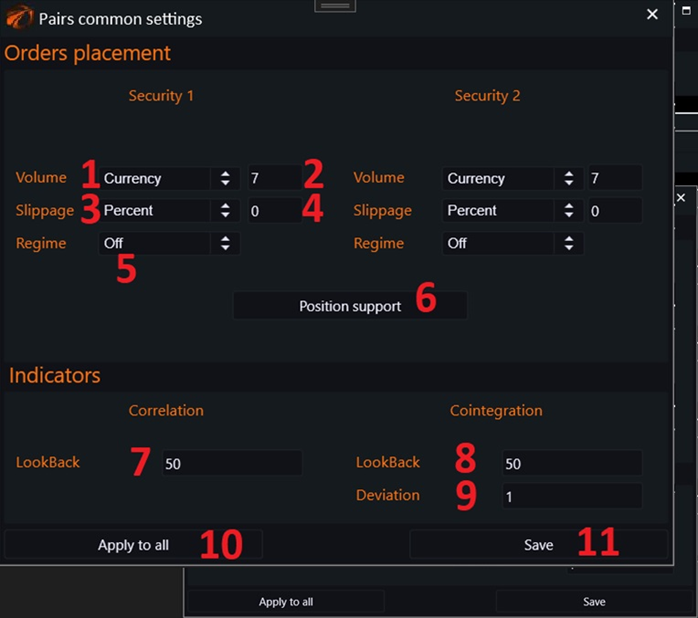
1) Volume type for the security. Types:
- a. «Currency» – Contract price. If the contract is denominated in rubles, it will be rubles. If in dollars, it will be dollars. For example, if BTCUSDT is denominated in USDT and you choose this type, it would mean you have selected 7 dollars.
- b. «Contract» – Number of contracts without conversion.
2) Volume input window.
3) Slippage type used when placing an order. Types:
- a. «Percent» – Slippage will be calculated as a percentage of the current contract price.
- b. «Absolute» – The absolute value entered by the user.
4) Slippage input window.
5) «Regime» – Trading mode for the instrument. Types:
- a. «Off» – Trading for the leg is disabled.
- b. «Limit» – Limit order. Slippage will start working in this case.
- c. «Market» – Market order.
- d. «Second» – Position for this leg will be taken at the market immediately after the position for the other leg is opened.
6) Position maintenance settings.
7) Length of correlation calculation between the instruments.
8) Length of residual difference chart calculation between instruments with the optimal multiplier (cointegration).
9) Deviation for lines on the residual chart (cointegration). This multiplier will be multiplied by the standard deviation on the residual chart. This will give us lines above and below zero on the residual chart.
10) Button to apply current settings to all pairs already created in the robot.
11) Save settings button. In this case, these settings will only apply to newly created pairs.
7 Pair window – charts.
To open a separate pair window, click on the «Chart» button in the pair table:
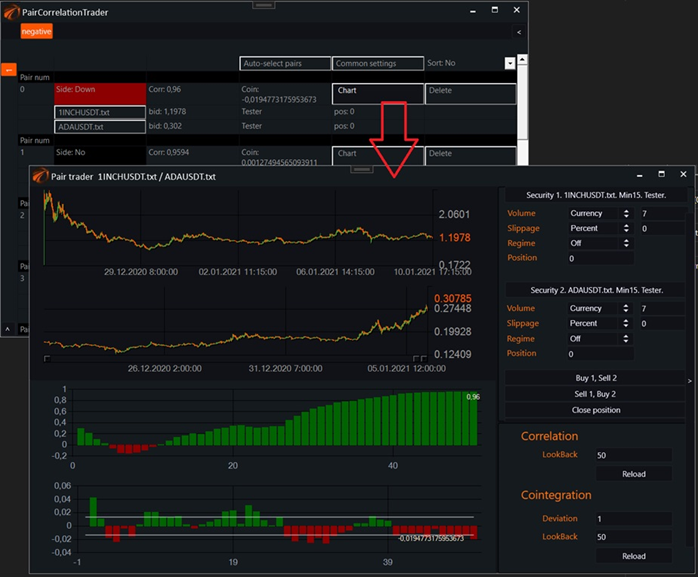
First, let's look at the charts inside this window and what's on them:
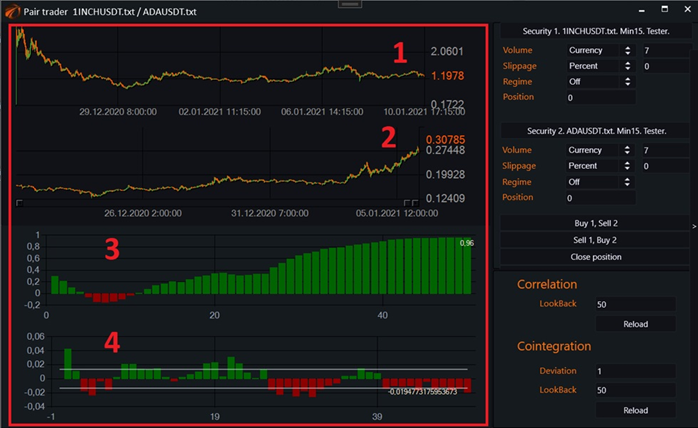
1) Candlestick chart of the first instrument.
2) Candlestick chart of the second instrument.
3) Correlation between the instruments in the form of a bar chart, constructed together with historical values to the depth of LookBack.
4) Residual plot of the difference between instruments with the optimal multiplier (cointegration).
8 Pair window – settings.
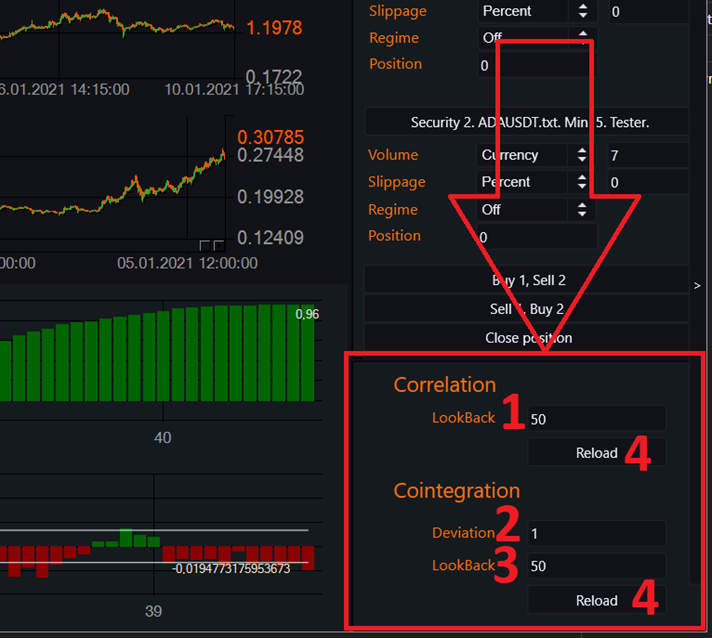
1) Length of calculation of correlation between instruments.
2) Deviation for the lines on the residual plot (cointegration). This multiplier will be multiplied by the standard deviation on the residual plot. This will give us lines above and below zero on the residual plot.
3) Length of calculation of the residual plot of the difference between instruments with the optimal multiplier (cointegration).
4) Apply current settings and recalculate the indicator based on the current settings button.
9 Pair window – trading.
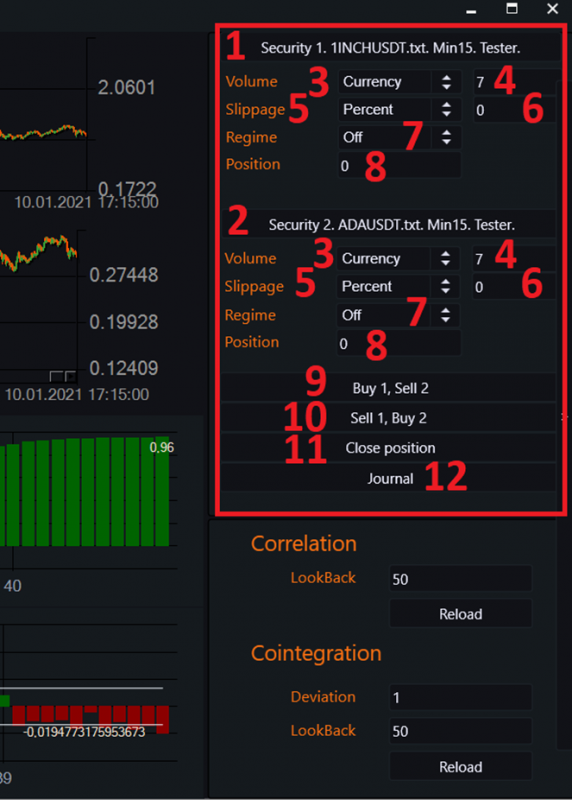
1) Call the window to connect instrument №1.
2) Call the window to connect instrument №2.
3) Volume type for the instrument. Types:
a. «Currency» – Contract price. For example, if the contract is denominated in rubles, then it's rubles. If in dollars, then dollars. For example, BTCUSDT is denominated in USDT. If this volume calculation type is chosen, in this case it would mean that we selected $7.
b. «Contract» – Number of contracts without conversion.
4) Input window for volume quantity.
5) Type of slippage that will be used when placing an order. Types:
a. «Percent» – slippage will be calculated as a percentage of the current contract price.
b. «Absolute» – user-input absolute value.
6) Input window for slippage quantity.
7) Regime – trading regime for the instrument. Types:
a. «Off» – trading is disabled for the leg.
b. «Limit» – limit order. In this case, slippage will come into play.
c. «Market» – market order.
d. «Second» – position for this leg will be taken at the market immediately after the position for the other leg is opened.
8) Current position for the instrument.
9) Buy instrument #1 and sell instrument №2.
10) Sell instrument #1 and buy instrument №2.
11) Close all positions.
If you have any difficulties or questions, please write to the support chat. Link