BotTabScreener Configuration from the Visual Interface.

Unlike the data setting window for standard robots, the window for setting up screeners looks slightly different. As an example, let's create a robot called SmaScreener from the standard assembly:

1. Click on the "Create Robot" button in Bot Trader Light.
2. Select "SmaScreener".
3. Give the robot a unique name.
4. Click on the "Accept" button.
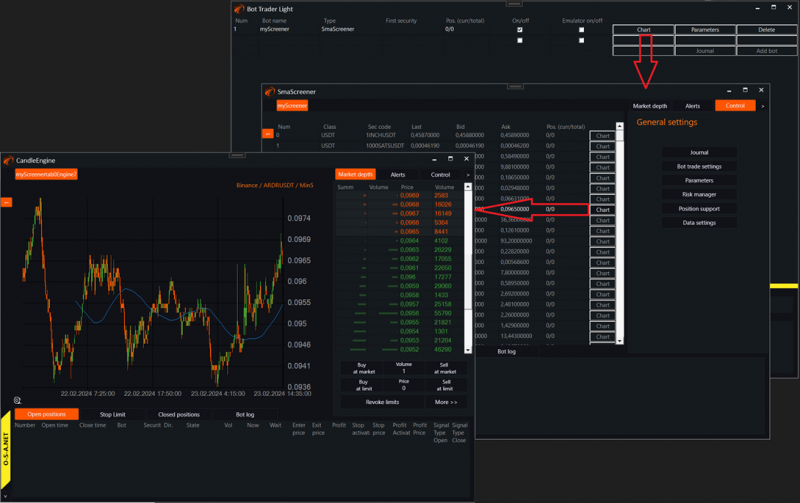
After creation, the robot will appear in the table of all robots in the interface:

1. Call up its interface.
2. Go to the "Control" tab in the right panel of robot management.
3. In the settings tab, select "Data Setting".
This will open the following window:
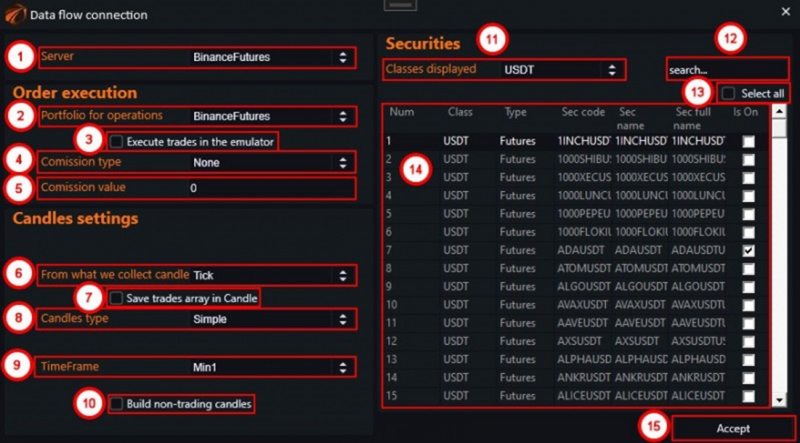
1. Dropdown list showing all connected connectors. Select the one on which the robot to be configured should work.
2. Portfolio for operations on which trading will be conducted.
3. Checkbox to enable or disable deal emulation mode.
4. Method of calculating commission for deals.
5. Commission size for each deal.
6. Indicates based on which data candles, ticks, or order book are built.
7. Flag indicating whether to save trade history in a candle during its formation.
8. Dropdown list setting the type of candles used. Classic Japanese, Renko, range, and others.
9. Time interval for Japanese candles.
10. Flag to indicate whether candles should be built for intervals when no deals were made.
11. Filters the table with instruments by asset class.
12. Field to search for trading securities by name.
13. Checkbox when activated selects all instruments available in the table.
14. Table of all available instruments on the exchange. Each row has a checkbox marking the instrument selected for adding to the screener.
15. "Accept" button to start the process of connecting to the necessary data streams.
By checking the instruments you want to select, you add them to the robot all at once. As a result, one screener can simultaneously view hundreds or even thousands of instruments. And all instruments will be visible in its window in the form of a table.

By clicking on any instrument previously added to the screener, you can call up its separate management window.
IMPORTANT 1!
In screener robots, the use of parameters is also available, but it should be noted that they are common to all instruments traded in the robot. They have a different architecture for creating robots. Please read the instructions carefully!
IMPORTANT 2!
Adding 400 or 2000 instruments may cause problems:
1. Your PC or remote server may not handle it.
2. Many connectors do not allow this and do not physically provide that many subscriptions.
3. Etc. In general, this is quite resource-intensive.
IMPORTANT 3!
Yes. The Tester fully supports the architecture of Screeners. It is a great way to test investment portfolios for rebalancing. However, in the tester, you should use candles of the SAME timeframe when testing screeners to avoid peeking into the future.
If you have any difficulties or questions, please write to the support chat. Link